Empowering Student Learning via Digital Media Creation: Resources and Tools

I attended the 4th Annual Higher Education Flipped Learning Conference June12-14, 2019.  My presentation was entitled “Empowering Student Learning via Digital Media Creation”.  The main theme of my presentation was the use of student -generated content in the flipped classroom.  Types of projects include video production, digital textbook authoring, podcasting, making infographics, comics and virtual field trips.  I discussed the elements involved in the project and the tools that are needed to make them.  Examples of student projects were shown.  I have prepared a resources and tools handout, which I am linking to this post.

How to Make Quick Screen Recordings with iOS Devices

Have you ever wanted to make a quick little video to show someone how to do something on an iPhone or iPad?  Or perhaps write out a quick note that can be emailed to a student showing how to solve a problem?  The former can be done on any iOS device, while the latter uses an iPad Pro and Apple pencil.  With this combo, you can record the screen as you draw on it and email the short video to the student.  This is all possible just using features available in the iOS 11 and 12 operating systems.You can choose to make a silent screencast, one that only records system noises or one that allows you to record your voice while making the screencast.  All you have to do to begin making screen recordings is to activate the screen recorder in the control panel of your device.

To make the screen recorder available, go into SETTINGS and open the CONTROL PANEL entry.  Open CUSTOMIZE CONTROLS and choose SCREEN RECORDING.  This will put the screen recording button on the control panel so you can activate screen recording with two gestures, the swipe that opens the control panel followed by a click of the record icon. That’s all there is to it!This will allow you to make silent screencasts or ones with system sounds if your device’s ringer is on.  Adding voice to the recording is easy. Instead of tapping the record icon, you need to 3D touch or long press it.  This will bring up the microphone icon.  Tapping on the icon will turn the microphone on (tapping also turns it off if it is already on).  After engaging the microphone, tap  “start recording”.  This will start a short count down.  When the count down reaches one, screen and voice recording will begin.  Your recording will be saved to the device’s Photos album.  From  the album, you can share the recording in a variety of ways including by email.

There are lots of hidden features in iOS.  Do you have one that you have discovered that is useful?


Need a FREE tool for Editing PDF Files?

Have you ever wanted to add an image, a signature, delete or add a page to a pdf file? You can do that with software such as Adobe Acrobat DC ($12.99/month); PDF Pen (mac $74.99) and PDF Expert (mac $59.99), all great software if you do a lot of pdf editing.  However, if you only need to occasionally modify a pdf document, there is a free open source solution available to you.

LibreOffice 6 is an open source competitor to the Microsoft Office Suite.  It contains the  traditional features of a word processor, spreadsheet and presentation module (Word, Excel and PowerPoint functions) and  an Access-like database.  In addition it has DRAW for creating vector graphics and other artwork and MATH for editing mathematical formulas. LibreOffice is available in versions for Windows, MacOS and some forms of Linux. Best of all, it is FREE!  You can learn more about LibreOffice 6 and download it here.

The DRAW module allows you to create a pdf from scratch or edit an existing document.  Once you have opened the document in DRAW, you can add, edit or delete text; add or delete pages; add images; add or change tables; add a digital signature; sign with a watermark; or set encryption/permissions, to name a few things you can do.  When you are done with your changes, you just export your masterpiece as pdf.

If your documents contain complex formatting, LibreOffice is probably not going to be your best solution, and you will want to use one of the more fully-featured tools.  However, if you only need to revise pdfs occasionally and have fairly basic editing needs, check out LibreOffice as free is a very good price!  Learn more about editing pdfs using LibreOffice here.

Simple Way to Input Text Without Using Your Phone’s On-Screen Keyboard

If you like writing rather than typing to take notes, then MyScript Stylus may be for you.  It is a keyboard that you load onto your mobile device allowing you to input information myscript_stylusby writing with your finger, stylus or Apple pencil.  This application converts your handwriting into digital text as you write.  To use the application, you activate it as a keyboard on your device.  It can be used for inputting text into email, your calendar, your word processor, etc…virtually anything that uses text.  The application is available for both IOS and Android devices, not just devices such as iPad Pros.  It  is particularly helpful for writing text messages and emails on mobile phones rather than trying to type using the on-screen keyboard.  The app is free and available from the Apple App store and the Google Play store.

Another Nifty Tool for Reading with Your Ears

I recently posted about a text-to-voice app called Voice Dream Reader which you can have read an open document to you on a mobile device. Allison Sheridan (Podfeet.cNarro copyom) recently wrote about another platform agnostic, nifty tool that will convert a website to audio called Narro, and I just had to try it out.  What is neat about this app is that it will take the url of a website you bookmark and convert the text into a podcast that is delivered to a podcast player on your mobile device.  Since I am a voracious consumer of podcasts, this is great.  The Narro podcast just gets merged into my play list for consumption.

Adding an extension to Chrome or a bookmarklet to the bookmarks bar in other browsers on your computer gives you a “button” that you click when you want the url for the website sent to Narro.  There is also an IOS Narro app that can be used while mobile surfing.  To use the service, you sign up for a free account at www.narro.co which provides you with your own personal podcast feed.  There are 15 voices with a variety of accents from which to choose for your listening pleasure, or you can have it do a rotation of voices.  Like Voice Dream Reader,  the voices are not real humans, but they are pretty good for machine generated voices.  With the free account, Narro will allow you 20 conversions per month.  If you need more conversions, Narro Pro is your ticket.  The pro version ($7.99/month) gives you other features as well.  It allows you to create audio files from plain text documents, sync articles from read it later services such as Pocket and Instapaper (does anyone really actually read the things stored there later?), convert emails and attachments to audio and have RSS feeds delivered in podcast form.  I use Feed Wrangler to deliver RSS feeds from several blogs into the Mr. Reader app every day.  However, many days I do not have time to read the posts so they just build up and get deleted when the list becomes too long.  Of course, I know that I throw away things I really needed to know about!  It would be great to have the RSS feeds come to me as a podcast daily for listening to when doing other tasks.  I haven’t yet decided if it is worth the monthly fee to have this feature, but I definitely am thinking about it.

You should check out Narro.  They do not ask you for any financial information when signing up for the free account so you don’t have to worry about ending up with some subscription you didn’t mean to pay for.  Why don’t you try it out…the price is right!

An Information Organization Tool for Academics and Students Alike

Tired of searching through hundreds of bookmarks or searching through a bunch of folders on your computer for that website or paper that you know you saw and now need but can’t remember where you put it?  I might just have a solution to your informational organization woes.

Every spring term I teach CH 407 Seminar which is a capstone class for our chemistry majors in which they are required to carry out an in depth literature review on a topic of current interest in chemistry, biochemistry, environmental or forensic science and present a public seminar on that topic.  One of the things I try to do in all my classes that involve students developing research and writing skills is to expose them to different technological tools that can aid in completing their projects.  This year the students learned to use an open source information manager called Zotero which allows you to collect, manage, and generate citations for research sources.  While there are a number of research management tools out there, Zotero is a good choice for students because it is both a cross-platform solution and is free!  Zotero was developed as a plug-in for Firefox but can work in other browsers such as Chrome and Safari through the Zotero standalone application.  Zotero allows you to organize your research materials into searchable project collections, attach pdfs, notes and images to your citations and generate bibliographies using word processors such as Word or OpenOffice.  You can sync your Zotero library allowing access from multiple computers.  References can be added to your Zotero library directly from a database, a journal’s website, a Google Scholar search, a library’s catalog, a webpage, from pdf files you have made by scanningdocuments or from pdfs that are stored on your hard drive, etc.  When needed, you can generate citations in one of more than two thousand formats.  This is a particularly useful feature for my students who are required to prepare and distribute an annotated bibliography to accompany their seminar presentation.  Here is a short video that gives you an overview of the features of Zotero:

While free is a very good price for students, there are other options for the gainfully employed academic.  Probably the closest rival to Zotero in the paid market is Endnote ($249.95 download or $299.95 shipped ; $113.95 with student discount).  Both tools possess many similar features.  There is a very good article in The Chronicle of Higher Education by Brian Coxall that compares the two products.  If you are interested in a reference management tool, I would suggest you read Brian’s article to see which solution is right for you.

Re-Kindling The Blog


This academic year has been incredibly busy, and as a result, I haven’t found the time to make posts to the blog.

Courtney_Dirks_To_do_graphicI hope to get some new content posted and revisit some topics that were raised in the past such as using mind-mapping software and other new tools in my Capstone Seminar class.  I also started a new project that involved a trip to the Galapagos Islands and will do some posts on what I am doing on that project that might be of interest to others.  Stay tuned…

Graphic: Courtney Dirks, FLICKER Creative Commons

A Nifty Way for Mac Users to Summarize Articles

I’ve been doing a lot of literature review for a new research project. One problem you run into when you come up with a large number of lengthy articles is time to read them. If you are a Mac user, there is a nifty tool available to help with this problem. This tool called “Summarize” allows you to condense an article to get the gist of it so you can decide if it is valuable for digesting in more detail later. These summaries also can be used the way we used 3 x 5 cards in the good ol’ days to catalog information when writing research papers. If you aren’t doing research, Summarize can be used just to abridge the daily news, etc. It is one of those interesting little tidbits in OS X that most Mac users have no idea even exists!

You have to activate this feature of OS X to be able to use it. To do this, go to the System Preferences menu (click on the little Apple at the top left of your screen to get there) and choose Keyboard. In the box of Keyboard preferences, choose the Shortcuts Option. system_preferences_summarize1
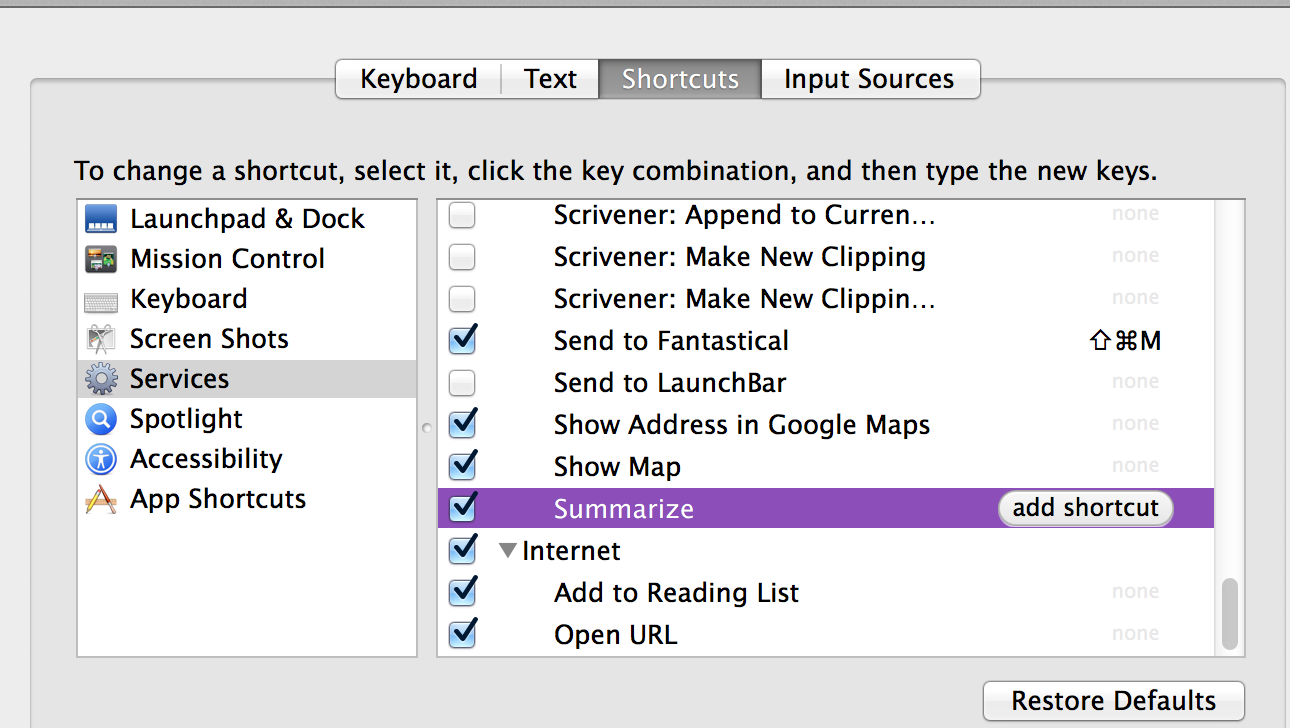
Choose Services in the lefthand pane. In the righthand pane, scroll down almost to the bottom and check the Summarize box. Clicking on “add shortcut” allows you to choose a keyboard shortcut for calling up the Summarize feature on the fly (my shortcut is option+command+s). You can now use this feature with anything you wish to condense such as a word processor document, website article, etc.

When reading a document, select the portion of the document you would like to condense (command+A will select the entire document), and open the Summarize function. If you did not make your own keyboard shortcut, you will have to access Summarize by right-clicking the selected text and choosing the Services option from the menu. When the Summarize window opens, you will see a plain text document. At the bottom of the window, you can alter how condensed the summary is by adjusting the summary length with a slider. In paragraph mode, Summarize chooses what it deems to be the most “important” words and shows you the paragraphs that use them the most. In sentence mode, Summarize chooses individual sentences containing the “important” words.system_preferences_summarize2

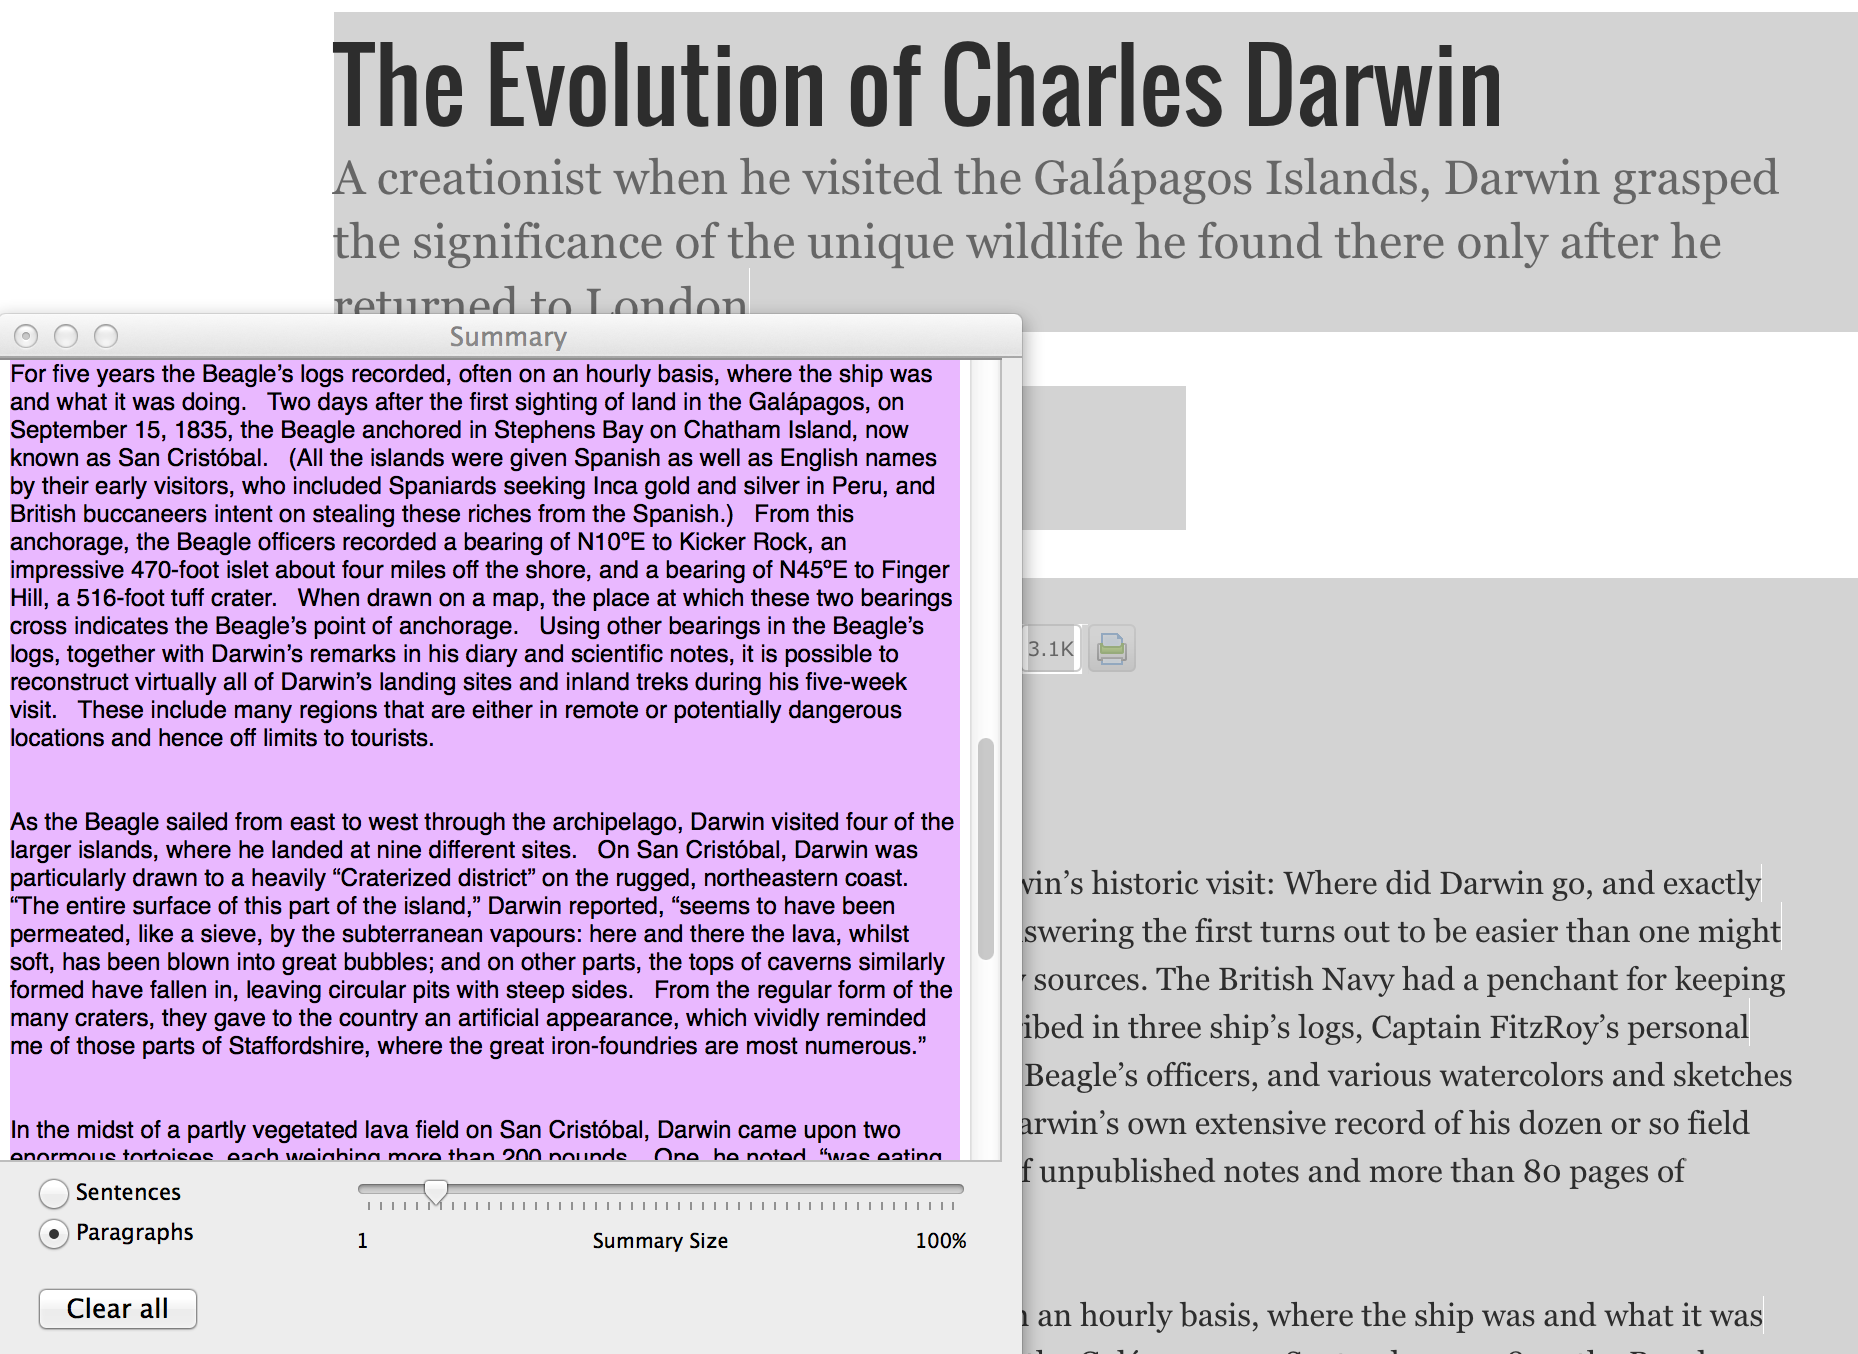
You can copy and paste the summary into another document or save the summary as a file (command+shift+S). The file is a text file that can be used in a word processor document or anything else that can use text files. When you name your file, if you manually add the RTF (rich text) extension, the Finder will be able to generate a preview of the document.

If you haven’t played with Summarize, give it a try to see if you have a use for it.  I don’t know of a similar function in Windows.  If someone knows of one, I would love to try it out.

If You Make “How To” Documents, This is a Really Sweet Deal!

I wrote an earlier post about Clarify by Blue Mango Learning Systems which is a great application for making quick tutorials demonstrating how to do something on a computer for your students or friends without investing a lot of time making screencasts.  The application allows you to capture computer screenshots and annotate them.

Clarify_iconClarify 2 is now available and has some new awesome features including the ability to now have nested steps, multiple images per step, nested lists, and use auto-numbering of steps.  You can output your tutorial into a customizable PDF, as a Word document, HTML, Markdown or send to a WordPress blog.  You can also make custom Word or HTML templates if you so desire.  To learn more about the features of Clarify 2, go to the Blue Mango website.  Clarify 2 is available for both OS X and Windows platforms, and there is also a cross-platform license which is what I have.  You can download a free 14-day trial version if you want to try it out.  However if you want a really sweet deal, you can get it for half-price from now through Cyber Monday from the Clarify Store for just $14.99 if you use the coupon code CYBERMONDAY2014.  If you haven’t already done an upgrade from the original Clarify to version 2, you can also do that for $14.99.

Electronic Storyboarding vs Analog Storyboarding

I use electronic mindmapping and storyboarding for my personal projects and also have my students create storyboards in a class wiki for classroom video creation.  This morning I read a blog post on indezine.com that discussed the merits of analog storyboarding, the good ol’ pencil and paper, versus electronic storyboarding for planning presentations and other projects. mindmap_iconThe point the author makes is that texture stimulates the brain and computers, phones and tablet surfaces do not have texture like paper.  He points out that braille is a language in which the feeling of the texure by the fingers stimulates a response in the brain and that touching food before eating evokes a satisfaction response in the brain even before you eat it.  However, in investigating one of his examples of how a book was designed using paper mindmapping/storyboarding, I did not see any reference to how the author’s use of analog tools was better than digital ones.  That author chose to use paper and sticky notes while other authors I know of choose to plan entire books using digital mindmapping tools.  

The article does provide food for thought.  My first idea is that no “one size” fits all and for some people analog might be better while for others electronic tools are better. I know that I can sit staring a a blank sheet of paper for a long time while I can quickly begin to tap and drag using a mindmapping application on my ipad.  Could it be that just the use of my hands stimulates the thought process?  Merely holding a pencil does not seem to work as well for me.  This would be an interesting research subject.  I would be interested in how others stimulate their thought processes.