A Simple App for Saving Anything You Want To Access Later

Captio is a no frills IOS app that lets you type or paste information onto the screen of your mobile device, hit the send button and have the information appear in your email inbox. Captio logo   All you need to do is enter your email address once into the app during setup, and you are set to go.  Although the app was originally designed for the user to send him/herself quick reminders, I find it to be a great application for sending web links from my iPad to either my Mac or PC computer for later use.  While I can do the same thing by writing myself an email, Captio really does this very efficiently as all I have to do is copy, paste onto the Captio screen and hit send.  I do not need to type an email address and delivery is extremely fast via Google’s mail servers.  Sometimes taking a photo of something is more efficient than typing a note, and you can add both photos and screenshots to Captio for delivery easily.

To make a screenshot on an IOS device, you press the Sleep button (located at the top or side depending on the device) immediately followed by pressing the Home button which stores the screenshot in the Photos app. captio_screenshot To transfer the screenshot, you press the “+” button in the lower right hand corner, click the picture icon, choose the screenshot photo, and hit send.  All of this takes about a total of 30 seconds.  While you can share photos via email, since Captio is set up to send directly to your inbox, the entire process is quicker than using your email app.  If you want to take a picture of something to send,  you hit the “+” button in the lower right hand corner of the Captio screen, click the camera icon, snap your photo and send.

If you are off-line and want to send yourself a reminder, Captio will store the email.  When your device is online again, it will automatically send the note to your inbox.

This is a great little app that does one thing (email pieces of information) and does it well.  Captio costs $1.99 in the Apple App Store and works on both the iPhone and iPad.

A Nifty Way for Mac Users to Summarize Articles

I’ve been doing a lot of literature review for a new research project. One problem you run into when you come up with a large number of lengthy articles is time to read them. If you are a Mac user, there is a nifty tool available to help with this problem. This tool called “Summarize” allows you to condense an article to get the gist of it so you can decide if it is valuable for digesting in more detail later. These summaries also can be used the way we used 3 x 5 cards in the good ol’ days to catalog information when writing research papers. If you aren’t doing research, Summarize can be used just to abridge the daily news, etc. It is one of those interesting little tidbits in OS X that most Mac users have no idea even exists!

You have to activate this feature of OS X to be able to use it. To do this, go to the System Preferences menu (click on the little Apple at the top left of your screen to get there) and choose Keyboard. In the box of Keyboard preferences, choose the Shortcuts Option. system_preferences_summarize1Choose Services in the lefthand pane. In the righthand pane, scroll down almost to the bottom and check the Summarize box. Clicking on “add shortcut” allows you to choose a keyboard shortcut for calling up the Summarize feature on the fly (my shortcut is option+command+s). You can now use this feature with anything you wish to condense such as a word processor document, website article, etc.

When reading a document, select the portion of the document you would like to condense (command+A will select the entire document), and open the Summarize function. If you did not make your own keyboard shortcut, you will have to access Summarize by right-clicking the selected text and choosing the Services option from the menu. When the Summarize window opens, you will see a plain text document. At the bottom of the window, you can alter how condensed the summary is by adjusting the summary length with a slider. In paragraph mode, Summarize chooses what it deems to be the most “important” words and shows you the paragraphs that use them the most. In sentence mode, Summarize chooses individual sentences containing the “important” words.system_preferences_summarize2

You can copy and paste the summary into another document or save the summary as a file (command+shift+S). The file is a text file that can be used in a word processor document or anything else that can use text files. When you name your file, if you manually add the RTF (rich text) extension, the Finder will be able to generate a preview of the document.

If you haven’t played with Summarize, give it a try to see if you have a use for it.  I don’t know of a similar function in Windows.  If someone knows of one, I would love to try it out.

Do You Ever Wish You Didn’t Need to Type the Same Thing Over and Over Again? Here’s Your Ticket!

Do you ever repeatedly type your name, certain phrases or terminologies, or write a lot of similar email responses?  If you do, tame those beasts with a text expansion application. Text expansion applications allow you to create snippets of text that you can use over and over again.   A snippet can be anything from a word or a single line signature to paragraphs of boilerplate verbiage. You assign a unique trigger abbreviation to each of your snippets.The expansion application runs in the background on your computer so that when you type the trigger abbreviation, your snippet of text is pasted into the document.

There are a number of text expansion applications out there, but the one I use on the Mac is TextExpander 4 ($34.95) from Smile Software.  One of the advantages oficon_home_textexpander TextExpander is that Smile also makes an iOS application, TextExpander touch ($4.99), which can sync with your TextExpander library via Dropbox allowing you to access your snippets both at your desk or on the go with an iPhone or iPad.

So what sorts of things can you do with TextExpander? You can use it to insert signatures that may contain either formatted text and/or graphic.  You can add headings and salutations used in letters or emails.  You can insert the current date and time in any format that you want to use and even do date/time math.  One nice application is the automatic correction of typos.  If you are like me, and there are some words that you commonly type incorrectly, you can use the commonly misspelled word as the trigger and have TE automatically correct the misspelling.  This is very different from that lovely autocorrect function that we find on smart phones and other mobile devices because you make your own library of correction words or phrases, and the computer does not “help” you out by guessing what you are trying to type!   With TE the word replacement is only triggered when you actually type in the misspelled word.

Perhaps the thing I like best is the ability to create boilerplate snippets containing form fields that allow a snippet to be “personalized”.  One of the tasks I do quite often is write recommendation letters for students applying to professional or graduate schools.  In these letters, I have several topics for which I always provide evaluation so I have generated boilerplate introductions for each of these topics that can be quickly “personalized” for each student.  This allows me to concentrate my time on the more important individual comments that I want to make about each student.

Here is the TE snippet I use at the beginning of my letter for my introductory comments about each student.  The %filltext part of the snippet generates a form fill-in into which I type the “personalizing” information.

TextExpander_form_letter

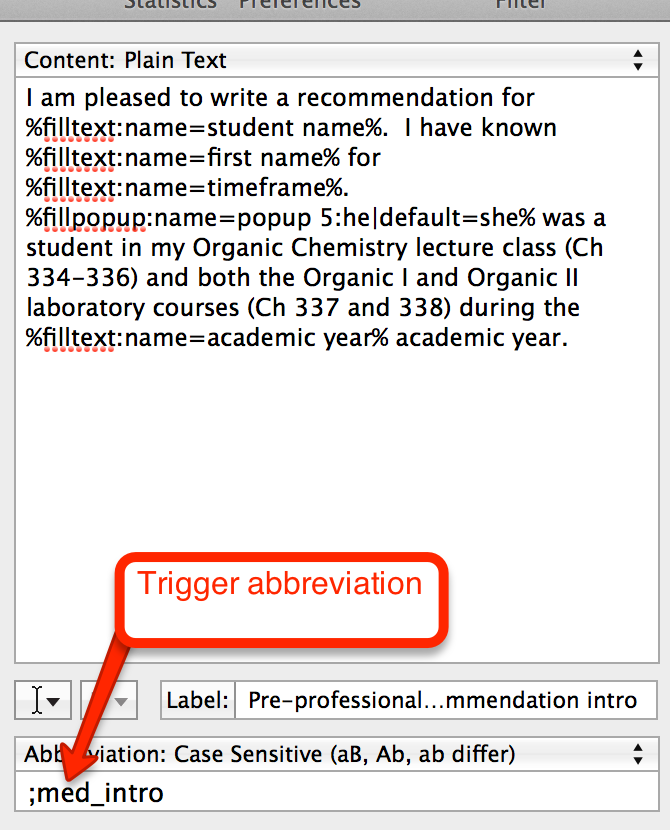
Here is the fill-in snippet that pops up on my screen when I type the trigger abbreviation. Notice that my trigger abbreviation is not something that I would accidentally type into a document!

TextExpander_form_letter-2

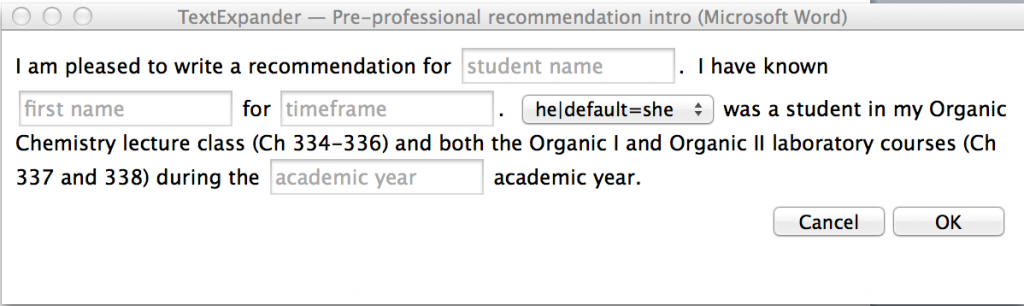
All that I have to do is type the information into the field boxes

TextExpander_form_letter-3

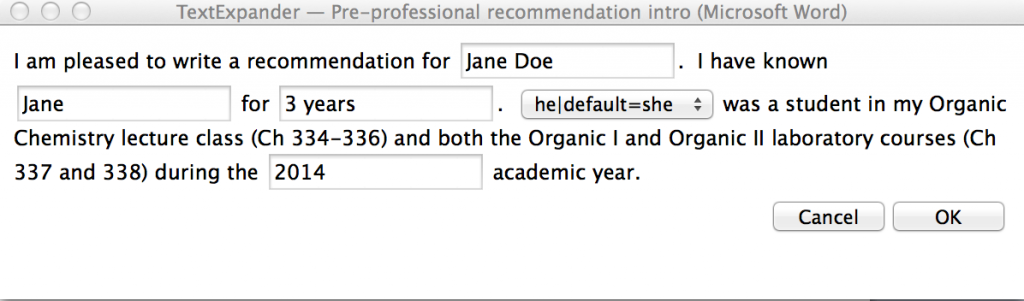
and voilà, this paragraph magically appears in my document!  I can then modify or add other information that specifically pertains to that student.

TextExpander_form_letter-4

I use TE snippets for emails that require only small changes from a stock response, have created items such as expense reports that are quickly filled in and have generated snippets for graphic items that I frequently use in my class materials.

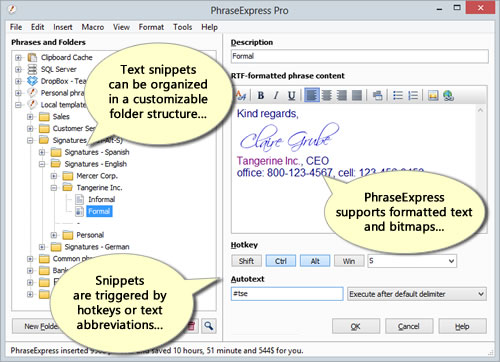
Since TextExpander is a Mac only application, what to do if you don’t have a Mac?    I personally have both a PC and a Mac running simultaneously on my desk at work that I bounce between so I wanted to have my snippets available on both machines.  PhraseExpress, which is billed as Text Expander for Windows, was my answer.  It can be used as a Windows only application or can sync pex9_main_program_window_500pxvia Dropbox with your TE library.  I have found the cross-platform interaction to be quite good.  Snippets created in TE work seamlessly for the most part on the PC, and snippets created on the PC get added to your TE library.  I haven’t done a lot with creating snippets on the PC so I can’t say whether or not the return journey to the Mac is always successful.  Although you can have image snippets in PhraseExpress, this is the one area where I have encountered incompatibility with my TextExpander library.  Typing the trigger abbreviation for a graphic has resulted in the graphic not being inserted by PhraseExpress.  For graphics used regularly, I solved this issue by creating graphic snippets in PhraseExpress that are triggered by the same keystrokes I use in TE.  This strategy seems to work well.  The standard version of PhraseExpress is free for personal use, and there is also an Android app. I don’t have any experience with the Android app so I don’t know how well it integrates.  Maybe someone out there with experience using both PhraseExpress and the Android app, can give a comment review.

No matter what your platform of choice is, go out, get a text expansion application and up your productivity!

iThoughts …Get It While It’s Hot!

I have been playing around with mind mapping tools lately and found out that an app I really like has been updated and is on sale. iThoughts-iPad iThoughts HD, a great iPad mind mapping tool, has been totally rewritten from the ground up and was released May 13 with a new name, iThoughts for iOS 7 which is universal for both the iPhone and iPad.  Since this release is essentially a new app, if you already own iThoughts HD, you will need to purchase it again.  However, for a limited time it is available for $1.99 in the iOS App Store which is 80% off the regular price.

In addition to the mobile app, there is a companion application for the Mac called iThoughtsX.  iThoughtsXYou can move your maps easily between your i-devices and Mac via iCloud, Dropbox, etc. allowing you to brainstorm anywhere.  When your mind map is complete, you can export it in a variety of ways including OPML, PDF and HTML for sharing or for use with other applications.  To celebrate the launching of iThoughts for iOS 7, the Mac version is also on sale for $48 which is 20% off the normal price.  Although this might seem to be a bit expensive, computer mind mapping tools often range in price from $100-$300.

You can purchase iThoughtsX either from the developer’s (Toketaware) website or from the Mac App Store.  Want to try before you buy?  You can download a free 14 day trial for iThoughtsX from Toketaware.  iThoughtsX licensing allows the software to be installed on multiple computers as long as only one person is using it at any one time.  The developer’s website indicates that educational discounts are available upon request.   Both the mobile and Mac versions are great pieces of software although I really like the convenience of the iPad version for use anywhere an idea strikes me.

Computer Screen Capture Made Easy…. and FREE!

A while ago, I posted about Clarify, a great application in which you make screen capture images and incorporate them with written instructions to generate tutorials.  jing_logoHowever, sometimes you just want to capture an image from your computer screen to use in a webpage or a slide show.  If you are using a Windows PC, you can capture the entire screen using the “Print Screen” utility (PrtScn key) or a specific window using the Alt+PrtScn key combination which copies the image to your clipboard.  If you only want to make an image of a portion of the screen, you will need to edit the screen shot using some graphics editing application.  If you are using a Mac, you can capture the entire screen using the key combo Command+Shift+3.  This will save the screenshot as a .png graphic file on your desktop.  You do have the ability to capture only a portion of your screen using the key combo Command+Shift+4.  When you use this combination, you will be able to draw a rectangle around the area you wish to capture and save the image to your desktop.  If you don’t want your image saved as a file but would rather be able to paste it directly into another application, you can place the capture on the clipboard using a four key combo by adding the Control key to either of the combinations above.  All of this works, but if you want to capture items on a screen frequently and add annotations as I do, you will want something with more capabilities.  TechSmith provides the perfect tool, Jing, and it’s free!

Jing is a utility that allows you to screen capture images, animations and video to either use in other applications or share on the web.  When running Jing in the background, a small unobtrusive sun is placed at the edge of the screen either at the top in Windows or on the upper side on the Mac.  free-jing-sunWhen you want to capture something on the screen, you drag your mouse over the sun, and three little sunbeams appear. The cross-hair icon is the one you select for screen capturing.  The middle beam (history) takes you to your list of past screen captures, and the beam with the gears allows you to modify your settings. Clicking on the capture beam brings up cross-hairs that you use to select the area of the screen you wish to capture.  Clicking on the image capture button in the menu that appears grabs the information that you want and places it in a window where you can modify it by adding text, arrows, highlighting, etc if you wish and then either copy the resulting image to the clipboard or save it as a .png file. jing_capture

You can also screen capture video up to 5 minutes long.  My very first how-to videos showing my students simple lab data collection via computer apps were done using this feature of Jing.   All you have to do is attach a microphone to your computer; select the region of the screen you wish to record; click the video capture button; and add your voice-over and computer actions.  You can upload your video to screencast.com for on-line viewing.  If you want to move around the screen during your screencast, Jing is not an appropriate tool, but it works great for very simple recording tasks.  If you need something more advanced for making video, TechSmith makes a very full featured screen capturing/video editing product called Camtasia which I use for recording the Powerpoint lectures I use in my flipped and online classes.  TechSmith also sells a more robust relative of Jing called Snagit ($49.95; $29.95 academic) that gives you more annotation tools and other advanced features.  Head on over to TechSmith and download a free copy of Jing


Nifty, Inexpensive Solution for File Transfer and Storage Capacity Expansion for Phones and Tablets

It doesn’t take long to fill up a 16 GB mobile phone or tablet with photos, video and other media-rich materials.  This really can be a problem if you are using your phone or tablet to shoot photos and/ or video for projects.  Another issue is how to easily get those photos and videos off your phone for backup purposes or how to get photos from a camera to an iPad for better viewing.

Kingston Technology makes a nifty and inexpensive device that fits in a pocket which can solve these issues and more called the MobileLite Wireless (MLW).  It allows you to stream audio content, photos and videos to a mobile device.  The MLW does not have built-in storage but rather serves as a wireless card reader allowing transfer of files between an SD card, USB thumb drive, portable hard drive or even a computer via USB and your iOS or Android device.mobilelite-iphone

So how does it work?  The battery powered MLW is the hub of a wireless network and connects to your mobile device via a free companion app.  Once connected, you can either transfer files or stream media to up to three wireless devices simultaneously.

Here are some examples of use cases for the device.  (1) You or your students have shot video or still photos on a cell phone and need to get them off the phone.   You can wirelessly transfer the data to either an SD card or USB drive to free up storage space or for editing.   (2) You have taken a group of photos that you want to view on a larger screen.  You can stream them to your iPad or other tablet while in the field to look at them.  (3) Less academically, you are traveling and want to watch movies on the trip without using up all the storage on your phone or tablet.  Just save them on a USB drive, portable hard drive or SD card to stream to your tablet or phone, and in fact, different members of your family can all be watching different movies simultaneously!  The manufacturer advertises a 5 hour battery life so you might almost be able to cover a coast to coast flight.

This is a great little device.  Kingston does make a similar product with on-board storage, but I like the idea of being able to take the appropriate media size I need for a given application with me.  If this is something that you could use,  I’d grab one now.  I bought mine from Amazon for $41.99, but it is currently listed at $36.


Super Simple Tutorial Creation

Ever wanted to make a quick tutorial demonstrating how to do something on a computer for your students or a friend?  You could create a screencast, but if you are like me, you would want it perfect which means investing a lot of time making it.  There is a simpler way.

Clarify_iconClarify by Blue Mango Learning Systems allows you to capture computer screenshots and annotate them.  Although there are any number of apps that allow you to make screen shots including utilities already built into your computer’s operating system, the beauty of Clarify is that you can combine your screenshots with how-to instructions and even non-screenshot images to create step-by-step tutorials.  The program is easy to use allowing you to quickly create your tutorial document which can be exported as an attractive PDF; copied into Word, Evernote or other applications as RTF; or converted to HTML via upload to clarify-it.com.  Clarify is available for both Windows and OS X for $29.99 or $39.99 for a cross-platform license.  For Mac users, Clarify is available from the Mac App Store.   However, there will soon be a new, major upgrade version (Clarify 2), and if you buy from the App Store, you will need to repurchase when it becomes available.  By purchasing from Blue Mango directly, you will be eligible to get the upgraded version. Clarify 2 is now in public beta and has some really great new features.

Want to give Clarify a try?  You can download a free 14-day trial at Clarify-it.com.


Great Meeting Scheduling Tool

Who hasn’t needed to schedule a meeting with a group of busy people?  It is often like herding cats!

I recently needed to come up with a schedule of candidate interview times for a lab tech position within our department working around the teaching, research and other obligation schedules of the four faculty members on the search committee.  I had heard about a webdoodle_com service, Doodle.com, at David Sparks’ and Katie Floyd’s Mac Power User Workflows session at the recent Macworld/iWorld Conference, so I decided to give it a try.  It worked like a charm.  Rather than asking everyone to give me the times they would like to meet, I sent out a list of times that fit my schedule for everyone to respond to with their availability.  Doodle provides the polling results as a nice, color-coded table that makes it easy to see when everyone is available at a glance.  No more series of back and forth emails or juggling pages of paper schedules.  Yippee!  In fact, I just sent a poll to all of my students presenting their senior seminars this term so I can set up a dress rehearsal schedule, normally a real time-eating task.

doodle_schedule

 Thanks David and Katie for the great productivity tip!  If you are not familiar with their “Mac Power Users” podcast, you should check it out.