Padlet, an Online “Bulletin Board” for Collaborative Class Projects

I am always interested in finding new instruments to use in student generated content projects.  Padlet is a device-neutral application that allows the displaying of information on any topic.  It can be used like a traditional bulletin board or for such activities as blogging, publishing podcasts or videos, bookmarking, making brochures and posters or as the base of a discussion board.   You can use Padlet as a publishing tool or just as a private notes app. This is a great application because it allows the collaboration of multiple people adding content to a padlet. Another nice touch is that work is autosaved as it is generated so work is not lost when students forget to save as can happen in some wikis.

You can choose who sees your padlets from the general public to just members of a class or even making your padlet completely private for your eyes only.  In a collaboration application, you determine the level of access by assigning individuals read only, read-write, moderator or administrative access.  Padlets can be collaborated on by a single class, multiple classes within the same institution or by classes at multiple institutions.  How fun would it be to have your class interact with experts via a padlet mechanism?  The uses for this app are endless.  Here is a link to an article on using Padlet for blogging in the classroom.

Some of the things you can include in a padlet are documents, images, hyperlinks, audio and video files. Files can be uploaded from a computer or mobile devices, and content from the web such as a YouTube video can be embedded into your padlet.  In turn, you can embed padlets into webpages, blogs or an LMS; export them as pdf files, images or a host of other files; or distribute them the old-fashioned way by printing them.

Padlet is available for use in a browser, and there are apps available for iOS, Android and Kindle devices.  There is a basic free padlet account available which allows you to have three operating padlets, however,  uploaded files must not be larger than 10 MB.  The basic plan is not a trial, but rather, an account that does not expire.  Padlet Pro is $8.25/month (or $99/year) with unlimited padlets and upload available for files up to 250 MB in size.  On the free plan, you can delete a padlet you no longer need to start a new one to keep within the three padlet limit.  For a collaborative project,  you can generate one padlet to be used by everyone in the class.    If you refer others who then sign up for a padlet account, you will be given an additional padlet for every three people who join from your referral.  If you are interested in signing up for a free account, you can help me out by using my referral link.

An Easy to Use App to Create e-Books

I have used a student-generated content project in my CH 361 Energy, Resources and the Environment class for quite a number of years.  In this class, we do not use a commercial textbook, but rather, students generate the e-textbook used.  This is done using a wiki platform.  The way the project works is that each class edits what has been previously written, updates the data and adds new sections.  Since the course is taught in alternating years, this keeps the textbook relatively current on a topic that is extremely fluid.  Although a wiki application works quite well for my purposes, it is a little limiting in the respect that the “book” is only available for reading online.

I am always looking for ways to improve the projects I use and found an app called Book Creator which allows you to add text, images, audio, and video to generate e-books.  Unlike applications such as i-Books Author, it is easy enough for anyone to use. It can be used by teachers to generate classroom resources, by students for creative projects or by anyone who wants to create an e-book. Here are some of the types of things this app could be used for:

  • instruction manuals
  • digital portfolios
  • lab notebooks
  • travel journals
  • textbooks
  • picture books
  • group creative writing books
  • the modern scrapbook
  • a recipe cookbook

I am sure there are a plethora of other applications for this app.  Although Book Creator was originally designed as an iPad app, it is now available as a web app as well.  When you are done creating your masterpiece, you can publish it for general distribution as an e-pub, an i-Book or a pdf document.  e-Pub is a universal format that can be read on any platform while i-Books are Apple specific.  The pdf is universal, but if the book has audio or video clips, they will not be incorporated into the final published form and would need to be made available to your audience through the web or other distribution mechanism.

Book Creator allows a teacher to generate a library that contains up to 40 books for free.  There are paid accounts that allow multiple libraries and larger numbers of books, but for many classroom applications, the free account is sufficient.  You do not have to be an actual teacher to sign up for an account and generate e-books.  Students can have individual accounts, but I haven’t explored that feature.  I am going to have students use this app in their capstone laboratory experience course next year for generating electronic laboratory notebooks.

You can learn more about Book Creator at  https://bookcreator.com/

A Non-Linear Creative Thinking Tool for Project Development

Most students when working on a research paper, seminar style presentation or other major project begin by writing an outline.  The problem with using outlining during the initial planning stages is that it locks you into a linear flow pattern which can be like putting on blinders.  A lesser number of students may use a mind mapping strategy which is more freeform although it does encourage starting from a central point.  Enter Scapple, a software application that provides a totally freeform way to get ideas flowing.  The Scapple canvas acts like a piece of paper on which you can write random ideas anywhere you wish without the necessity of making any connections during the creative thinking process.  As development proceeds, lines can be added to connect ideas as shown in the image below from the Scapple website. The application allows the student to easily experiment with different idea connection patterns.  Once a desired flow is obtained, the student can convert it to an outline if he/she wishes.  For the last few years, my chemistry students have successfully used Scapple in the development of their senior seminars.

Scapple is an inexpensive application available for both macOS and Windows from Literature and Latte.  A regular license for either platform is $14.99 while an educational license is $12.  Literature and Latte has a very lenient policy allowing a single license to be used on multiple computers as long as they are owned by the licensee.

If you think you have a use for such a tool,  you should download it an try it out.  Literature and Latte allows you to download a fully functional version of the application and use it for 30 days of actual use (not just a period of calendar days) which is more than enough time for you and/or your students to use it for organizing a project.


My iPad Love Affair

When Steve Jobs took the stage on January 27, 2010 announcing the “revolutionary” iPad, I thought why in the world would I need a supersized iPod Touch?  Of course, I Vector-iPad_thumbdidn’t… but, got mine the very first day.  It was indeed a magical device which quickly made me wonder how I had lived my life without one.  I have upgraded several times since that day.  I carry a retina mini with me everywhere and have an iPad Air 2.  I use them primarily as information consumption devices for reading, web surfing and video, but do use them for some productivity activities such as note taking, spreadsheet calculations, managing class Moodle sites, editing pdfs and minor writing when on the go.  I must say I do love my iPads!

For a long time, there were rumors that Apple was going to produce a large screen iPad.  I wondered why would I want a steroidal iPad to tote around?  I have a mini because I don’t want to pack around the standard size iPad.  This was one Apple i-device that I did not even consider pre-ordering before it launched.

I teach several courses that are either predominantly or completely online offerings; all have significant writing components, and the students in these classes turn in their work as pdf documents.  During the grading process, I want to be able to scribble comments, corrections, make little drawings, etc on the documents for returning to the students. This is especially important because the students in an online class are often unable to come to my office to discuss their work with me.  I can edit pdf documents on a computer by inserting comment boxes and highlighting the writing, but it never is as clear and efficient as being able to mark up the work with a pen.  My workflow in the past has been to print each pdf, mark it up, scan it and return it to the student by email or some other method.  This has killed many a tree and resulted in carting around a messenger bag crammed full of paper.  So the problem to be solved is how to effectively give feedback to students while saving trees (important to someone like me who teaches environmental courses.)

The solution?  An iPad Pro coupled with the Apple pencil!  The pencil is the game changer here, but, unfortunately, it only works with the Pro and not other iPads. With ipadpro_pencil-hand-printthe pencil, I can write on the screen just like writing on paper (truly you can!)  It is legible, at least as legible as my handwriting is.  I can change up colors of “ink” which when combined with highlighting and striking out words does exactly what I would do with paper documents.  When I am done, I can upload the corrected documents to the students via my Moodle shell.  No trees have been killed, only some electrons rearranged!

Here is my workflow:  I download the student pdf documents into a Dropbox folder and open them in PDFpen for IOS from Smile Software.  I append a pdf of the scoring rubric to the end of each document (sometimes I already have done this using PDFpen Pro on my Mac) and then proceed to annotate them with the pencil.  After syncing with Dropbox, I upload the graded documents into the Moodle shell for students to pick up.  Can I say this is magical?

The iPad Pro is a monster.  It is big.  It is heavy, and it is certainly expensive.  You are not going to put this thing in your pocket, and you get tired when trying to hold it up in portrait mode.   Actually, it probably isn’t much different in weight than an original iPad, but it is much more unwieldy.  It is fine to use on a desk or table, and the screen real estate does have its advantages.  With the ability to split the screen between two apps in IOS 9, you can work with two documents side by side which can be very useful.  You can see an entire written page very nicely in portrait mode.  I hope Apple will make pencil use available on the next iteration of the iPad Air as that would be a great form-function pair.

I can foresee some additional productivity use cases for the iPad Pro.  Although I have never envisioned using an iPad as a computer replacement because I need to work with software that is not available on a tablet, I do foresee being able to leave my 15″ Macbook Pro home while traveling when I don’t need access to such applications.  The screen size is great for word processing, and Microsoft has done a nice job with the Office apps for the iPad (assuming you have an Office 365 subscription). I am sure I will find other uses that take advantage of the pencil and sweet screen.

If you think you might have a use for this device, go to an Apple Store and play with one using the pencil before you buy it.  This is not going to be something everyone, or even many people, are going to need.  I didn’t want one, but it solves a big deal problem in my life so I have to say I have rekindled my love affair with the iPad!


Surfacing from Mounds of Documents: Reading with Your Ears!

Journal articles, pdfs, webpages, etc….so much to read…..so little time!

If you are like me, you have mounds of documents to read.  Many years ago, I was an early adopter of an Audible subscription.  For those of you who are unfamiliar with it, Audible, now a subsidiary of Amazon, sells audiobooks.  I have little time to read fun stuff so I listen to the best new books, classics and anything in between while driving, flying, going to the VoiceDreamReadergym, doing house chores, etc.  It is a great service, but it does not help me get through all the professional stuff I need to read.  So, the problem to be solved is how to use some of this time to get some professional reading done.  The solution is an app for mobile devices called Voice Dream Reader.

Voice Dream Reader will read almost anything text to you excluding DRM-protected documents.  The app was designed to make text accessible to the visually impaired as well as those with dyslexia and other learning styles.  If you have a tablet such as an iPad, you can turn on the screen reading accessibility option to have what is on the screen read to you.  I have tried this and found it to be cumbersome although you can use it with texts such as Kindle books which do not work in Voice Dream.

The app is incredibly easy to use.  You open the document you wish to have read to you and press the play button.  As the text is being made audible, the line being read is highlighted on the screen with the current word appearing in a box.  Although I don’t really have a use for that, I think it is a great feature for aiding those who are learning to read or have difficulty reading.  The program is auto-scrolling so you do not have to change the pages of the document manually, and you can adjust the speed of the reading from very slow to speed reading.  There are multiple voices available so you should be able to find one you like, and the program can read to you in 30 languages.  To start being productive, all you have to do is open your document, don your headphones, press play and do your chores or work out.

I find this to be a great way to digest documents I have saved as pdf files.  My work flow for this is to save the text as a pdf, print to pdf or scan the document.  If I scan the document using my Fujitsu Scan Snap, it automatically asks me if I would like to OCR the document which I do.  If I have scanned document some other way, I open it in PDFpen Pro (an awesome OS X program for working with pdfs), and OCR it.  Doing the OCR not only allows me to use the pdf with Voice Dream but also makes the text searchable which has lots of other uses.  Voice Dream Reader handles a large number of file formats other than pdf as well.VoiceReaderContent

Voice Dream Reader is not Audible!  There is no human reading you the document.  It is definitely a computerized voice that does not always get the pronunciation right and does not recognize that a hyphen at the end of a line of type splits a word into pieces that should be combined for reading.  While this can sometimes be a bit annoying, voice technology has come a long way in sounding more natural, and I find these annoyances a small price to pay for how it helps me get stuff done.

Voice Dream Reader is available for both IOS and Android devices for $9.99 and comes with one voice, Heather.  Additional voices can be obtained as in-app purchases.


How to Use “Animation” to Spice Up A Classroom PowerPoint Slide.

PowerPoint presentations are frequently referred to as “death by PowerPoint” because often the slides are crammed with paragraphs of words or lists of bullet points.  The slides that come with textbooks are often perfect examples of what I believe should not be used in a classroom lecture.   For example, here are the two consecutive presentation slides that come with the text that I use in my organic chemistry class.  They are a copy of a figure from the text book outlining how one draws the chair form of a cyclohexane ring.

cyclohexane1

cyclohexane2These are not horrible slides, but they show too much information all at once.  It is human nature for us to read everything that appears on a slide rather than listen to what the presenter is saying.

It is very easy to make an “animation” that gets across the same information without having an overwhelming amount of information projected on the screen at all times.  Here is a short video that I have made showing how this same information can be imparted using very simple techniques in PowerPoint.

Obviously, in the classroom, we work our way through the information in a step-wise manner over a period of several minutes. Here I am just quickly clicking through the two slides.  In the lecture, the students have been given a handout onto which they physically draw the chair form of cyclohexane as we progress through the “animation”. Drawing the cyclohexane chair may seem like an easy thing for students to do, but traditionally, mine do not seem to be able to make intelligible drawings without some guidance!  While working our way through the “animation”, everything on the figure from the text is incorporated into the discussion plus we look at physical “ball and stick” models allowing the students to relate their drawing on paper to the three dimensional molecule.

Making this more interactive visual was not very difficult.  If I can make something graphic, anyone can as I have little artistic talent!  All that was required was to insert lines, boxes or circles using the shapes on PowerPoint’s drawing toolbar and then tell them when and how to appear and disappear using the animation toolbar and animation pane.  Although it takes more time to make slides like this compared to just typing a list of bulleted items or using a stock figure from a text book, it is far more interesting and attention holding for  your audience.  With small bits of information appearing on the screen, students are less likely to quickly read what is on the screen and go back to their social activities like texting, tweeting, etc.

Most people tend to remember pictures better than paragraphs of words so I try to incorporate pictures as much as possible on my slides and use words somewhat sparingly so they have more impact when they do appear.  If you want to give students more information, you can always provide them with a lecture outline or make presenter notes to share.


Using Video Documentary Creation in the Science Classroom

A number of my classes have a significant project-based learning (PBL) component.  All of my classes are upper division Chemistry courses except for one, General Science, a liberal arts core course for students in the University’s Honors Program.  I team with an Earth Science colleague to teach the third term of this year long sequence course.  The students in our class are not science majors, rather, most are majoring in the arts, humanities, social sciences or education.  photographerWhile we teach some physics, chemistry, earth and environmental science through the topic of energy and energy resources, much of the students’ in depth learning comes from researching an energy topic of current interest and creating a video documentary about it.  The documentaries are used for class learning and are also presented in a public screening during Western Oregon University’s Academic Excellence Showcase. The project is a rather daunting one for our students as we are on the 10-week instructional quarter system, and in reality, they only have about 6 weeks from the time they start their research until the date of the Showcase event.  We have found over six years of using this instructional approach that production pairs work most effectively. There just is not enough time for single students to complete the work while larger groups invariably result in unequal divisions of labor.

Video production is writing in disguise, a term paper on steroids if you will.  Whereas a term paper is a very individual assignment written by a student and typically only shared with an instructor, the videos are writing shared with many people.  The project has a number of stages, and each provides students with the opportunity to learn some academically useful skills and improve their collaboration skills.  The stages are:

  1. Research
  2. Script Writing/Storyboarding
  3. Audio Recording
  4. Video Editing
  5. Proceedings Abstract Writing
  6. Presentation

Research

The research portion of the project is very similar to what a student does for a typical term paper.  However, during this phase, students are not just learning about their topics and collecting references.  They are also looking for imagery and video clips that they might be able to use.  We use this stage to teach about copyright and the Creative Commons.  If the students find non-Creative Commons pictures or video clips they would like to use, they learn how to seek the permission of the copyright holders to incorporate the materials into their projects.  We also provide a library of video clips we have recorded for them to use and royalty free materials.  Another skill we teach is how to locate scientific information and how to determine the validity of what they find.

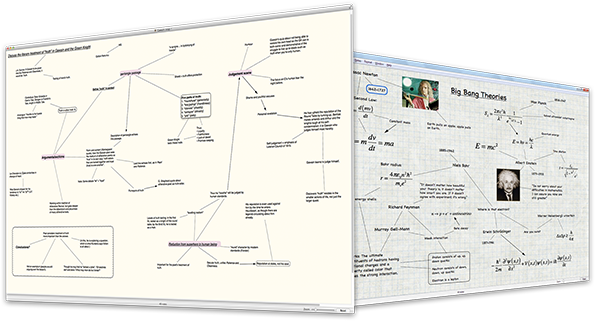
Since this is a collaboration between two students, we provide them with a shared folder on the university network for storing files.  We have developed a class wiki site (hosted by PBworks), and each production team has a group of pages for storing research, composing their abstracts and developing the documentary storyboard.  The wiki serves two purposes.  It allows both members of the production team to add and edit materials (also members of other teams can drop anything they find that might be of use onto another team’s wiki space), and it allows the instructors to monitor each team’s progress to ensure they are keeping on schedule and make comments and suggestions.

Storyboarding

Once the students have gotten a significant amount of their research done, they develop a storyboard for the project.  For our purposes, a storyboard consists of a two column table with rows for each of the “scenes” in the video.  One column contains notations of the visual materials that will be on the video track, and the second column contains the audio (narration, music, sound effects) that will accompany those visuals on the audio track.  This is where the students write their narration script.   All of this is done on the wiki so we can read the scripts as they develop.

Recording the Narration

Once the script is written, students record their narration.  We use Audacity, a free audio recording software package, available for both Wiindows and Mac which does not have a huge learning curve.

Video Editing

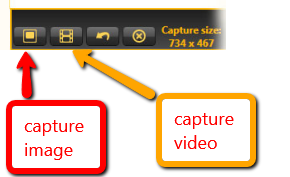
Once the narrative recording is completed, it is laid down as the audio track to start the video editing process.  The visual track is then constructed with still graphics, video clips, transitions, titles, etc.  We use Adobe Premiere Elements, available in both Windows and Mac editions, as our video editing software. This software is quite powerful for a consumer software package and does have a learning curve.  To get the students up and running, I have created a web module with screencast tutorials of all the basic features needed to create a video.  Early in the term, we familiarize the students with the software by having them create a short 1-2 minute video clip with an audio track (learning Audacity), video from stock visuals (although they can opt to shoot their own), transitions and titles.  We devote several class/lab sessions to the actual video editing of the documentary project so I can trouble shoot and help with technical aspects.

Proceedings Abstracts

Western Oregon University allocates one day each spring (typically the Thursday after Memorial Day) for students to present academic work in a professional meeting environment which is open to all segments of the university community as well as the public at large.  This is the forum through which our senior Chemistry majors present their seminars, and the students in our General Science class show their videos.  A Proceedings with abstracts of all the presentations is published for the event.  The unfortunate part of the abstract writing exercise is that the deadline for abstract submission occurs before the students have completed their narrative due to the time frame needed to compile and print the abstract volume.  We teach about abstract writing, the students collaboratively write their abstracts within the wiki, and then we do group editing during a class session.

Presentation

When the Academic Excellence Showcase day comes, the students are present for the public screening of their videos.  Each pair of producers sit in directors chairs at the front of the auditorium and introduce their video, tell why they chose their topic and share something interesting that they learned during the research process.  After the videos are shown, they entertain questions from the audience.  This process can be a bit daunting to our students who are often freshman and sophomores as the lecture hall in which the screenings occur is often filled to standing room capacity (70 or more).

Miscellaneous Comments

We do devote a lot of class time to these projects so you may wonder how we cover the course content.  The theory behind project-based learning is that students learn more about a subject if they develop their own knowledge through an in depth study of a particular topical area than by a traditional overview of a subject.  Our students learn from their own research topic as well as from the range of topics covered in their classmates videos.  The members of the class watch and critique the other students videos multiple times, and the material from these topics is queried on the final exam.  During the term, we do cover basic physics, chemistry and earth science concepts as well as topics not explored in a given year’s video productions.  Much of the course content is delivered using a flipped classroom style methodology where students watch video lectures and complete web modules I have generated, watch videos on alternative energy topics, watch videos from previous years classes, read articles on energy innovations, conduct hands-on lab exercises, etc. We have conducted surveys of our students over the years we have been teaching this class, and the majority of the students rate their class experience favorably.  Some reoccuring themes we see in the surveys are that the students were afraid of the project because they came into the class with few of the technological skills needed for making a video; the students liked taking responsibility for their own learning; they were proud of what they accomplished and would recommend the class to others.  I am old fashioned… I believe that self-esteem and confidence comes from tackling challenges, learning from mistakes, and ultimately accomplishing a goal.  Our students, who are not going to be scientists and may even be “afraid” of science, leave our class confident that they can research a scientific topic and learn what they need to know to be an informed citizen.  This is my goal for these students!

Six years ago, Philip Wade, whose specialization is Earth Science education, and I undertook this as an investigation to see how alternative learning experiences can be used in the university classroom, and we are very pleased with the results.  It takes much more effort to teach the class in this manner than if we used a traditional lecture approach.  We have presented our findings via poster and oral presentations at several meetings of the American Geophysical Union (AGU) and were invited to write a chapter, “Using Video Projects in the Science Classroom”, in the monograph New Trends in Earth Science Outreach and Engagement, Advances in Natural and Technological Hazards Research published (December 2013) by Springer based on one of our oral presentations.  In addition, a number of our student videos have been selected each of the last two years for showing along side commercial productions as part of the AGU Cinema held during the AGU fall meeting in San Francisco.  We plan to submit entries this summer from this year’s class for consideration for next December’s Cinema.

It is true that our students’ videos are not technically perfect.  There is just not sufficient time to mix the audio and to get the levels even throughout the production and to fix other imperfections.  Oh, what I would give for a 15-week semester course!  We give our students freedom to tell their stories however they wish.  While most use a “Ken Burns” style, we have had students write a play and do the acting, write their own music , make their own models, etc.  I am surprised we haven’t seen a “rap” version yet…we do encourage them to be creative! Here are some examples of this year’s videos (note that each video begins with about 10 seconds of a leader so the video does not begin abruptly at the screening).  I’d love to see any comments or suggestions you have.

Coal

An excellent student effort


Cracking the Case on Fracking

This is an interesting way of telling a story.  It was “performed” and filmed by the two students.  The background image is a tree trunk section showing the growth rings in case you are wondering.


The Ocean: Energy in Waves

This one contains some very nice imagery


Black Gold – Texas Tea

A well done look at petroleum


One Man’s Trash is Another Man’s Fuel

This video takes you to an energy generating facility not far from the university’s campus

Computer Screen Capture Made Easy…. and FREE!

A while ago, I posted about Clarify, a great application in which you make screen capture images and incorporate them with written instructions to generate tutorials.  jing_logoHowever, sometimes you just want to capture an image from your computer screen to use in a webpage or a slide show.  If you are using a Windows PC, you can capture the entire screen using the “Print Screen” utility (PrtScn key) or a specific window using the Alt+PrtScn key combination which copies the image to your clipboard.  If you only want to make an image of a portion of the screen, you will need to edit the screen shot using some graphics editing application.  If you are using a Mac, you can capture the entire screen using the key combo Command+Shift+3.  This will save the screenshot as a .png graphic file on your desktop.  You do have the ability to capture only a portion of your screen using the key combo Command+Shift+4.  When you use this combination, you will be able to draw a rectangle around the area you wish to capture and save the image to your desktop.  If you don’t want your image saved as a file but would rather be able to paste it directly into another application, you can place the capture on the clipboard using a four key combo by adding the Control key to either of the combinations above.  All of this works, but if you want to capture items on a screen frequently and add annotations as I do, you will want something with more capabilities.  TechSmith provides the perfect tool, Jing, and it’s free!

Jing is a utility that allows you to screen capture images, animations and video to either use in other applications or share on the web.  When running Jing in the background, a small unobtrusive sun is placed at the edge of the screen either at the top in Windows or on the upper side on the Mac.  free-jing-sunWhen you want to capture something on the screen, you drag your mouse over the sun, and three little sunbeams appear. The cross-hair icon is the one you select for screen capturing.  The middle beam (history) takes you to your list of past screen captures, and the beam with the gears allows you to modify your settings. Clicking on the capture beam brings up cross-hairs that you use to select the area of the screen you wish to capture.  Clicking on the image capture button in the menu that appears grabs the information that you want and places it in a window where you can modify it by adding text, arrows, highlighting, etc if you wish and then either copy the resulting image to the clipboard or save it as a .png file. jing_capture

You can also screen capture video up to 5 minutes long.  My very first how-to videos showing my students simple lab data collection via computer apps were done using this feature of Jing.   All you have to do is attach a microphone to your computer; select the region of the screen you wish to record; click the video capture button; and add your voice-over and computer actions.  You can upload your video to screencast.com for on-line viewing.  If you want to move around the screen during your screencast, Jing is not an appropriate tool, but it works great for very simple recording tasks.  If you need something more advanced for making video, TechSmith makes a very full featured screen capturing/video editing product called Camtasia which I use for recording the Powerpoint lectures I use in my flipped and online classes.  TechSmith also sells a more robust relative of Jing called Snagit ($49.95; $29.95 academic) that gives you more annotation tools and other advanced features.  Head on over to TechSmith and download a free copy of Jing


Nifty, Inexpensive Solution for File Transfer and Storage Capacity Expansion for Phones and Tablets

It doesn’t take long to fill up a 16 GB mobile phone or tablet with photos, video and other media-rich materials.  This really can be a problem if you are using your phone or tablet to shoot photos and/ or video for projects.  Another issue is how to easily get those photos and videos off your phone for backup purposes or how to get photos from a camera to an iPad for better viewing.

Kingston Technology makes a nifty and inexpensive device that fits in a pocket which can solve these issues and more called the MobileLite Wireless (MLW).  It allows you to stream audio content, photos and videos to a mobile device.  The MLW does not have built-in storage but rather serves as a wireless card reader allowing transfer of files between an SD card, USB thumb drive, portable hard drive or even a computer via USB and your iOS or Android device.mobilelite-iphone

So how does it work?  The battery powered MLW is the hub of a wireless network and connects to your mobile device via a free companion app.  Once connected, you can either transfer files or stream media to up to three wireless devices simultaneously.

Here are some examples of use cases for the device.  (1) You or your students have shot video or still photos on a cell phone and need to get them off the phone.   You can wirelessly transfer the data to either an SD card or USB drive to free up storage space or for editing.   (2) You have taken a group of photos that you want to view on a larger screen.  You can stream them to your iPad or other tablet while in the field to look at them.  (3) Less academically, you are traveling and want to watch movies on the trip without using up all the storage on your phone or tablet.  Just save them on a USB drive, portable hard drive or SD card to stream to your tablet or phone, and in fact, different members of your family can all be watching different movies simultaneously!  The manufacturer advertises a 5 hour battery life so you might almost be able to cover a coast to coast flight.

This is a great little device.  Kingston does make a similar product with on-board storage, but I like the idea of being able to take the appropriate media size I need for a given application with me.  If this is something that you could use,  I’d grab one now.  I bought mine from Amazon for $41.99, but it is currently listed at $36.


Is it PowerPoint That’s Bad, or the Way We Use It?

PowerPoint gets a lot of negative criticism because so often presentations (and class lectures) using it are filled with slides crammed with words, tables full of hard to read data and mind numbing lists of bullet points….but is that a fault of PowerPoint or the way in which so many people use it?work_dantes-vision-of-hell-powerpoint2

I had the opportunity to attend a full day workshop on Keynote 6 (an Apple product) presented by Les Posen of Melbourne, Australia at MacWorld/iWorld last month. I have to say that Les is truly a presentation magician, and I was really sorry when it was time for the workshop to end!  Although I own Keynote, I had never played around with it.  I have always been a PowerPoint user.  It is true that there is a lot of really cool stuff that you can do in Keynote that you can’t really do in PowerPoint, but there are a lot of things you can do with PowerPoint to make engaging presentations.  Although Les showed us a lot of interesting things we could do with Keynote, the main content of the workshop was the psychology of presentations (Les is a psychologist) and how to design presentations to engage the audience.  First on the list is to get rid of slides filled with words, which is something I already try to do.  Some of the worst slides I have ever seen for engaging an audience are the stock presentation slides that come with chemistry text books often comprised of entire pages of paragraph length bullet points.  Who designs these things?  Have they ever actually looked at them on a screen?

My thoughts are that rather than blaming the software (although there are lots of areas in which PowerPoint could be improved), perhaps we need to change how we think about what we put into a presentation and how we can make it more engaging for our audiences.

There are a number of tricks that you can do to bring animation to slides with static drawings or to make data on tables, graphs or charts more visually appealing with trends easy to see.  Since I use PowerPoint as the screencast base for the recorded lecture videos I use in my flipped classes, I have had to come up with a number of techniques to allow me to animate objects on slides that you can’t animate directly.  I will post some of the things I do as I find time.

If you are interested in learning more about how to make great presentations, I would suggest that you check out Les Posen’s blog, “Presentation Magic – The Art, Science and Magic of Presenting“.  Although Les is a died-in-the-wool Keynote man, his tenets apply to any tool you might want to use to prepare presentations.