Computer Screen Capture Made Easy…. and FREE!

A while ago, I posted about Clarify, a great application in which you make screen capture images and incorporate them with written instructions to generate tutorials.  jing_logoHowever, sometimes you just want to capture an image from your computer screen to use in a webpage or a slide show.  If you are using a Windows PC, you can capture the entire screen using the “Print Screen” utility (PrtScn key) or a specific window using the Alt+PrtScn key combination which copies the image to your clipboard.  If you only want to make an image of a portion of the screen, you will need to edit the screen shot using some graphics editing application.  If you are using a Mac, you can capture the entire screen using the key combo Command+Shift+3.  This will save the screenshot as a .png graphic file on your desktop.  You do have the ability to capture only a portion of your screen using the key combo Command+Shift+4.  When you use this combination, you will be able to draw a rectangle around the area you wish to capture and save the image to your desktop.  If you don’t want your image saved as a file but would rather be able to paste it directly into another application, you can place the capture on the clipboard using a four key combo by adding the Control key to either of the combinations above.  All of this works, but if you want to capture items on a screen frequently and add annotations as I do, you will want something with more capabilities.  TechSmith provides the perfect tool, Jing, and it’s free!

Jing is a utility that allows you to screen capture images, animations and video to either use in other applications or share on the web.  When running Jing in the background, a small unobtrusive sun is placed at the edge of the screen either at the top in Windows or on the upper side on the Mac.  free-jing-sunWhen you want to capture something on the screen, you drag your mouse over the sun, and three little sunbeams appear. The cross-hair icon is the one you select for screen capturing.  The middle beam (history) takes you to your list of past screen captures, and the beam with the gears allows you to modify your settings. Clicking on the capture beam brings up cross-hairs that you use to select the area of the screen you wish to capture.  Clicking on the image capture button in the menu that appears grabs the information that you want and places it in a window where you can modify it by adding text, arrows, highlighting, etc if you wish and then either copy the resulting image to the clipboard or save it as a .png file. jing_capture

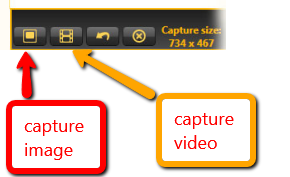
You can also screen capture video up to 5 minutes long.  My very first how-to videos showing my students simple lab data collection via computer apps were done using this feature of Jing.   All you have to do is attach a microphone to your computer; select the region of the screen you wish to record; click the video capture button; and add your voice-over and computer actions.  You can upload your video to screencast.com for on-line viewing.  If you want to move around the screen during your screencast, Jing is not an appropriate tool, but it works great for very simple recording tasks.  If you need something more advanced for making video, TechSmith makes a very full featured screen capturing/video editing product called Camtasia which I use for recording the Powerpoint lectures I use in my flipped and online classes.  TechSmith also sells a more robust relative of Jing called Snagit ($49.95; $29.95 academic) that gives you more annotation tools and other advanced features.  Head on over to TechSmith and download a free copy of Jing


Nifty, Inexpensive Solution for File Transfer and Storage Capacity Expansion for Phones and Tablets

It doesn’t take long to fill up a 16 GB mobile phone or tablet with photos, video and other media-rich materials.  This really can be a problem if you are using your phone or tablet to shoot photos and/ or video for projects.  Another issue is how to easily get those photos and videos off your phone for backup purposes or how to get photos from a camera to an iPad for better viewing.

Kingston Technology makes a nifty and inexpensive device that fits in a pocket which can solve these issues and more called the MobileLite Wireless (MLW).  It allows you to stream audio content, photos and videos to a mobile device.  The MLW does not have built-in storage but rather serves as a wireless card reader allowing transfer of files between an SD card, USB thumb drive, portable hard drive or even a computer via USB and your iOS or Android device.mobilelite-iphone

So how does it work?  The battery powered MLW is the hub of a wireless network and connects to your mobile device via a free companion app.  Once connected, you can either transfer files or stream media to up to three wireless devices simultaneously.

Here are some examples of use cases for the device.  (1) You or your students have shot video or still photos on a cell phone and need to get them off the phone.   You can wirelessly transfer the data to either an SD card or USB drive to free up storage space or for editing.   (2) You have taken a group of photos that you want to view on a larger screen.  You can stream them to your iPad or other tablet while in the field to look at them.  (3) Less academically, you are traveling and want to watch movies on the trip without using up all the storage on your phone or tablet.  Just save them on a USB drive, portable hard drive or SD card to stream to your tablet or phone, and in fact, different members of your family can all be watching different movies simultaneously!  The manufacturer advertises a 5 hour battery life so you might almost be able to cover a coast to coast flight.

This is a great little device.  Kingston does make a similar product with on-board storage, but I like the idea of being able to take the appropriate media size I need for a given application with me.  If this is something that you could use,  I’d grab one now.  I bought mine from Amazon for $41.99, but it is currently listed at $36.


Animating a PowerPoint Table

What happens when you put a table on the screen while giving a presentation?  First, everyone starts reading it rather than listening to what you have to say.  If the table contains a lot of data, some people just zone out.  Even if the table is well designed and not off-putting, your punch line is there for all to see so why do they need to pay attention to what you have to say?

So how can you use tables more effectively?  I think one way to improve the use of tables in a presentation is to animate them so that only the bits on the screen that are being revealed are directly related to what you are saying.  Simple right?  Well, not quite if you have designed your table in PowerPoint.  You cannot directly animate a PowerPoint table, but there is a work around.  Unfortunately, if you are using PowerPoint for Mac, I haven’t found a way to use this trick.

Here is a little tutorial I have put together describing how to animate a table you have created in PowerPoint 2010.  I generated this tutorial using Clarify and was able to export the tutorial directly to Word Press using the Clarify 2 public beta which was pretty neat.  I am assuming you already know how to use the basic animation features of PowerPoint.


I would suggest that you duplicate the slide you are going to work on before beginning the animation process just in case fate is against you!

Step 1. Make a copy of your table.

Select the table you want to animate, copy it to the clipboard and delete the original table.

Step 2.  Reinsert the table from the clipboard.

Paste the table back to the slide using the “Paste Special” function choosing the Picture (Enhanced Metafile) or Picture (Windows Metafile) option.

Step 2.  Reinsert the table from the clipboard.

 At this point you have converted your table into a picture that you will be able to modify.

Step 3.  Ungroup the various table entries.

When the table is selected, you will see a new menu called the Picture Tools Menu.  Click on Format.  There will be a menu item, “Group” on the menu ribbon that appears.

Step 3.  Ungroup the various table entries.


Open the dropdown menu and select “ungroup”.  This will bring up a dialog box informing you that the item is an imported picture.  Choose “yes” to convert your picture into an Office drawing object and redo the ungroup action.


After doing this, you will see that all of the table entries are now separate items that can be used in an animation scheme.

Step 4.  Preparing a row for animating

First click outside the table to unselect all the entries.  To make the United States row appear on a single mouse click, group all the column entries for that row together.  This is done by holding down the shift key while clicking each column entry you wish to include.  Open the Drawing Tools Format menu and choose “group”.  Then repeat this process for each row of the table.

Step 4.  Preparing a row for animating

Step 5. Animate the table

From the Animation Menu, open the Animation Pane.  To animate the United States row, select the row group and choose the manner in which you want the group to enter, for example, “Appear”.

Step 5. Animate the table

 Repeat the process for each succeeding row.

Step 6.  Test the Animation

Here is the reveal of the first row.

 After a few more mouse clicks, the table looks like this:

 You can group items in your table to reveal data in any manner that you would like.  That is all there is to it!

Super Simple Tutorial Creation

Ever wanted to make a quick tutorial demonstrating how to do something on a computer for your students or a friend?  You could create a screencast, but if you are like me, you would want it perfect which means investing a lot of time making it.  There is a simpler way.

Clarify_iconClarify by Blue Mango Learning Systems allows you to capture computer screenshots and annotate them.  Although there are any number of apps that allow you to make screen shots including utilities already built into your computer’s operating system, the beauty of Clarify is that you can combine your screenshots with how-to instructions and even non-screenshot images to create step-by-step tutorials.  The program is easy to use allowing you to quickly create your tutorial document which can be exported as an attractive PDF; copied into Word, Evernote or other applications as RTF; or converted to HTML via upload to clarify-it.com.  Clarify is available for both Windows and OS X for $29.99 or $39.99 for a cross-platform license.  For Mac users, Clarify is available from the Mac App Store.   However, there will soon be a new, major upgrade version (Clarify 2), and if you buy from the App Store, you will need to repurchase when it becomes available.  By purchasing from Blue Mango directly, you will be eligible to get the upgraded version. Clarify 2 is now in public beta and has some really great new features.

Want to give Clarify a try?  You can download a free 14-day trial at Clarify-it.com.


Easy File Transfer Between an Android Phone and Mac or i-Device

How do you transfer files from an Android phone to a Mac or i-Device?  One way is to place a copy of the file from your phone into Dropbox or some other cloud storage solution and then copy it to your Apple device. Ever wished you could get rid of the middle-man and directly transfer between the two platforms?  Now you can…enter the Droid NAS app from Code Sector.

Droid NAS is an Android app that allows your phone to act SMBas a standard SMB server on your Mac.  SMB is a client server, request protocol which makes file systems and other resources such as printers and mailslots available to a client (your computer) on a network.  Basically, what the app does is allow file sharing between the Android device and Apple product when they are on the same Wi-Fi network. Droid_NASYour phone will show up like a flash drive in the Finder on your Mac allowing you to copy files both to and from your phone using the app.  Within the app, you can specify the types of files that are available for sharing on a particular network allowing you to control accessibility to your sensitive data depending on the security level of your network connection. You can even set up different profiles for use on different networks such as your home, office or the Starbucks down the street and have the appropriate profile automatically accessed when your phone connects to the network.

This is a great way to get those snapshots off your Android phone and onto your Mac.  Unfortunately, the app does not work with Linux or Windows.  The app is free from the Google Play app store.


Is it PowerPoint That’s Bad, or the Way We Use It?

PowerPoint gets a lot of negative criticism because so often presentations (and class lectures) using it are filled with slides crammed with words, tables full of hard to read data and mind numbing lists of bullet points….but is that a fault of PowerPoint or the way in which so many people use it?work_dantes-vision-of-hell-powerpoint2

I had the opportunity to attend a full day workshop on Keynote 6 (an Apple product) presented by Les Posen of Melbourne, Australia at MacWorld/iWorld last month. I have to say that Les is truly a presentation magician, and I was really sorry when it was time for the workshop to end!  Although I own Keynote, I had never played around with it.  I have always been a PowerPoint user.  It is true that there is a lot of really cool stuff that you can do in Keynote that you can’t really do in PowerPoint, but there are a lot of things you can do with PowerPoint to make engaging presentations.  Although Les showed us a lot of interesting things we could do with Keynote, the main content of the workshop was the psychology of presentations (Les is a psychologist) and how to design presentations to engage the audience.  First on the list is to get rid of slides filled with words, which is something I already try to do.  Some of the worst slides I have ever seen for engaging an audience are the stock presentation slides that come with chemistry text books often comprised of entire pages of paragraph length bullet points.  Who designs these things?  Have they ever actually looked at them on a screen?

My thoughts are that rather than blaming the software (although there are lots of areas in which PowerPoint could be improved), perhaps we need to change how we think about what we put into a presentation and how we can make it more engaging for our audiences.

There are a number of tricks that you can do to bring animation to slides with static drawings or to make data on tables, graphs or charts more visually appealing with trends easy to see.  Since I use PowerPoint as the screencast base for the recorded lecture videos I use in my flipped classes, I have had to come up with a number of techniques to allow me to animate objects on slides that you can’t animate directly.  I will post some of the things I do as I find time.

If you are interested in learning more about how to make great presentations, I would suggest that you check out Les Posen’s blog, “Presentation Magic – The Art, Science and Magic of Presenting“.  Although Les is a died-in-the-wool Keynote man, his tenets apply to any tool you might want to use to prepare presentations.

No GoPro? Use a Smartphone!

Have you ever wished you could take your class on a virtual mini-field trip, or do your students go into the field to collect data (which would be neat to film), but you don’t want to carry a bunch of gear so you can get video?Montage_d'une_Gopro_HD_sur_un_masque_de_chasse_sous-marine  The GoPro is a great little wearable video action cam intended to take about any abuse from being bashed on rocks to submerged in the ocean.  However, even though the GoPro is pretty inexpensive, you still probably do not want to buy them by the bundle for student outings.  So what’s the solution?

The majority of students in our classes have smartphones flickr-2830319467-hd, and you probably have one with you wherever you go.  The bonus is that most smartphones have quite good cameras and video capability.  If you want some great tips for how to use a smartphone as a GoPro-substitute safely and effectively, you might check out this article in VideoMaker magazine.  This is really going to be useful for my Honors General Science class students in their documentary projects.