Zoom Whiteboard Notes & Directions
How to use the Zoom whiteboard
- To open the whiteboard, click on the share screen button and then select the whiteboard option.
- This will open a whiteboard that can be used collaboratively.
- These will primarily be used in breakout sessions where your group will work together to solve a given task.
- Only one person needs to open the whiteboard and the whole group will be able to annotate on the shared whiteboard.
How to annotate while sharing
- If you are the student who shares their screen and opens the whiteboard, you will get a toolbar that pops up on your screen.
- If you don’t see the annotation tools, click Annotate or Whiteboard (with the pencil) on the shared screen main toolbar.
How to annotate while someone else is sharing
- If you are viewing a shared whiteboard, click the View Options dropdown menu on the shared screen main toolbar and click Annotate and the annotation toolbar will pop up.
Annotation tools

- Note: The Select and Spotlight options are only available if you started the whiteboard.
The tools
- Mouse: Deactivate annotation tools and switch to your mouse pointer. This button is blue if annotation tools are deactivated.
- Select (only available if you started the shared screen or whiteboard): Select, move, or resize your annotations (including text box). To select several annotations at once, click and drag your mouse to display a selection area.
- Text: Insert text. You can type and you can cut and paste text into the text box.
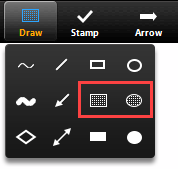
- Draw: Insert lines, arrows, and shapes.
Note: To highlight an area of the shared screen or whiteboard, select the indicated square or oval icon (below) to insert a semi-transparent square or oval. The color of the semi-transparent shape can be changed using the format button.

- Stamp: Insert predefined icons like a check mark or star.
- Spotlight / Arrow: Turn your cursor into a spotlight or arrow.
- Spotlight (only available if you started the shared screen or whiteboard): Displays your mouse pointer as a “spotlight” to all participants when your mouse is within the area being shared. Use this to point out parts of the screen to other participants.
- Arrow: Displays a small arrow instead of your mouse pointer. Click to insert an arrow that displays your name. Each subsequent click will remove the previous arrow placed. You can use this feature to point out your annotations to other participants.

- Eraser: Click and drag to erase parts of your annotation.
- Format: Change the formatting options of annotations tools like color, line width, and font.
- Undo: Undo your latest annotation.
- Redo: Redo your latest annotation that you undid.
- Clear: Delete all annotations.
How to open another page on the Zoom whiteboard
- To open another page, click on the indicated button. Only the student sharing the whiteboard will be able to see this option and move the group between pages.

How to save the Zoom whiteboard
- To save the Zoom whiteboard, you need to have the annotation toolbar open.
- If you are the host of the whiteboard, you can click save and this will download a picture of the whiteboard to your computer.
- If you are viewing a shared whiteboard, you can click save and it will download a screenshot of the entire computer screen.
- For collaborative work that is going to be submitted, please have the student who is sharing their screen save the whiteboard, this eliminates the participants’ videos and other items on your screen that will appear if it is saved by another student who isn’t sharing their whiteboard.
- The whiteboard can be saved at any time.
- If you have more than one whiteboard page open, when the person hosting the whiteboard saves them, they will download as more than one image (one image for each page).


