Advisors
Navigate Resource Hub
WHAT IS NAVIGATE?
Navigate (or, formerly, Wolf Connection System) is a student success management system that allows students, advisors, faculty, staff, and administrators to proactively manage and promote student success in a coordinated care network. In other words, it’s a tool for connection and success.
WHY DO WE USE NAVIGATE?
Navigate will help students understand their education journey while at WOU, improve pathways to graduation, and connect with support services across campus. Navigate fosters the opportunity for students to make meaningful connections with WOU resources and people that are imperative to their academic and personal success.
TELL ME MORE ABOUT WHY I SHOULD USE NAVIGATE!
Click on one of the boxes below to learn more about the different functions of Navigate, how to utilize them, and what items would be most useful for you.
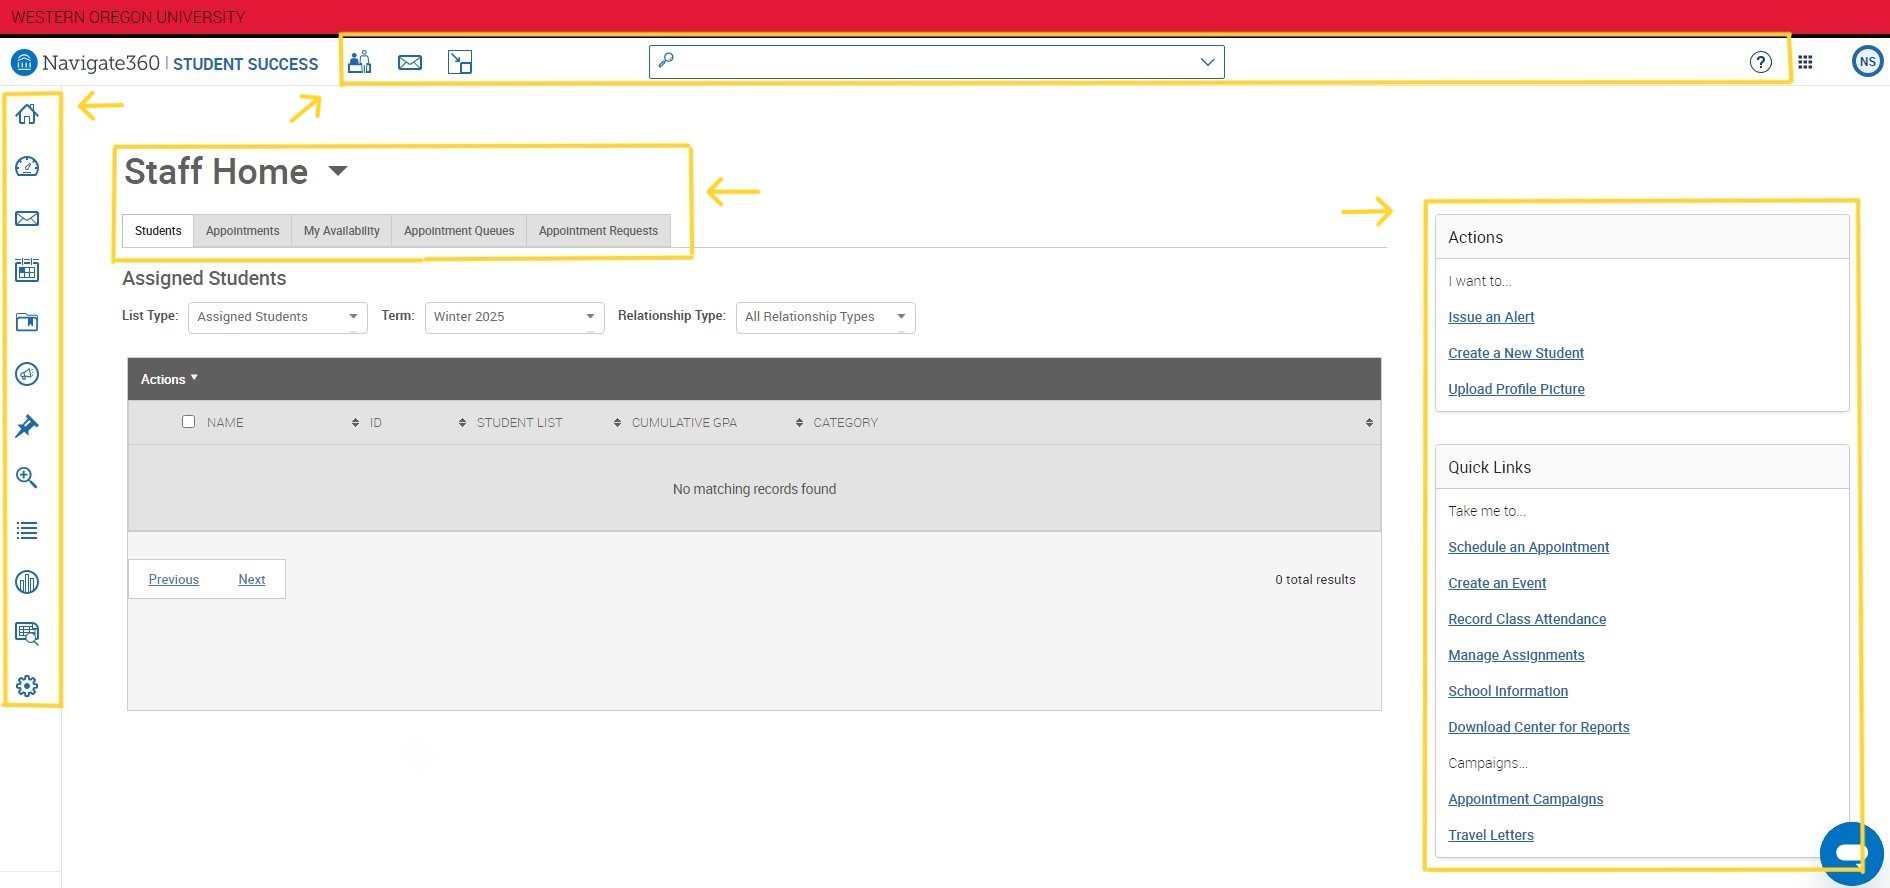
HOMEPAGE NAVIGATION
1 – The Toolbar (left side of screenshot). The toolbar has icons for quick access to various features in Navigate. You can hover over each icon to see the name of its function. Some of the key features are highlighted below.
![]() Home icon – Select this to return to your main Navigate home page.
Home icon – Select this to return to your main Navigate home page.
![]() Cases icon – Select this to review new cases (alerts) that may be assigned to you and view the progress of cases you have opened.
Cases icon – Select this to review new cases (alerts) that may be assigned to you and view the progress of cases you have opened.
![]() Campaigns & Events icon – Select this to create new appointment campaigns and check the status of in progress campaigns.
Campaigns & Events icon – Select this to create new appointment campaigns and check the status of in progress campaigns.
![]() Advanced Search icon – Select this to search for your students using a variety of parameters and searching features.
Advanced Search icon – Select this to search for your students using a variety of parameters and searching features.
![]() Lists and Saved Items icon – Select this to view searches and student lists you have saved.
Lists and Saved Items icon – Select this to view searches and student lists you have saved.
2 – Quick Access Bar (top of screenshot). In this section, you can quickly see any new conversations when a students responds to your messages (also sent to your email inbox), do a quick search for students by name or V-Number (which students you can search varies by your user role), select the desired term (defaults to the current term), or click on the Help button for access to tutorials and additional resources.
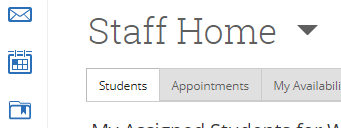
3 – User Profile and Appointments (middle of screenshot, ‘Staff Home’ in above example). This section indicates what role you are in within Navigate (staff, student, etc). If you have multiple roles, such as professor and staff (most common as an advisor role), you can select the drop down arrow next to the user profile to switch your roles to utilize the features specific to that role. The tabs underneath the advisor role allow you to see your upcoming appointments, set up your appointment availability and your personal appointment link, and more.
4 – Quick Links (right side of screenshot. The links on the right hand side of the page can take you quickly to common areas of Navigate, such as issuing an alert or recording class assignments.
ADVISEE LIST
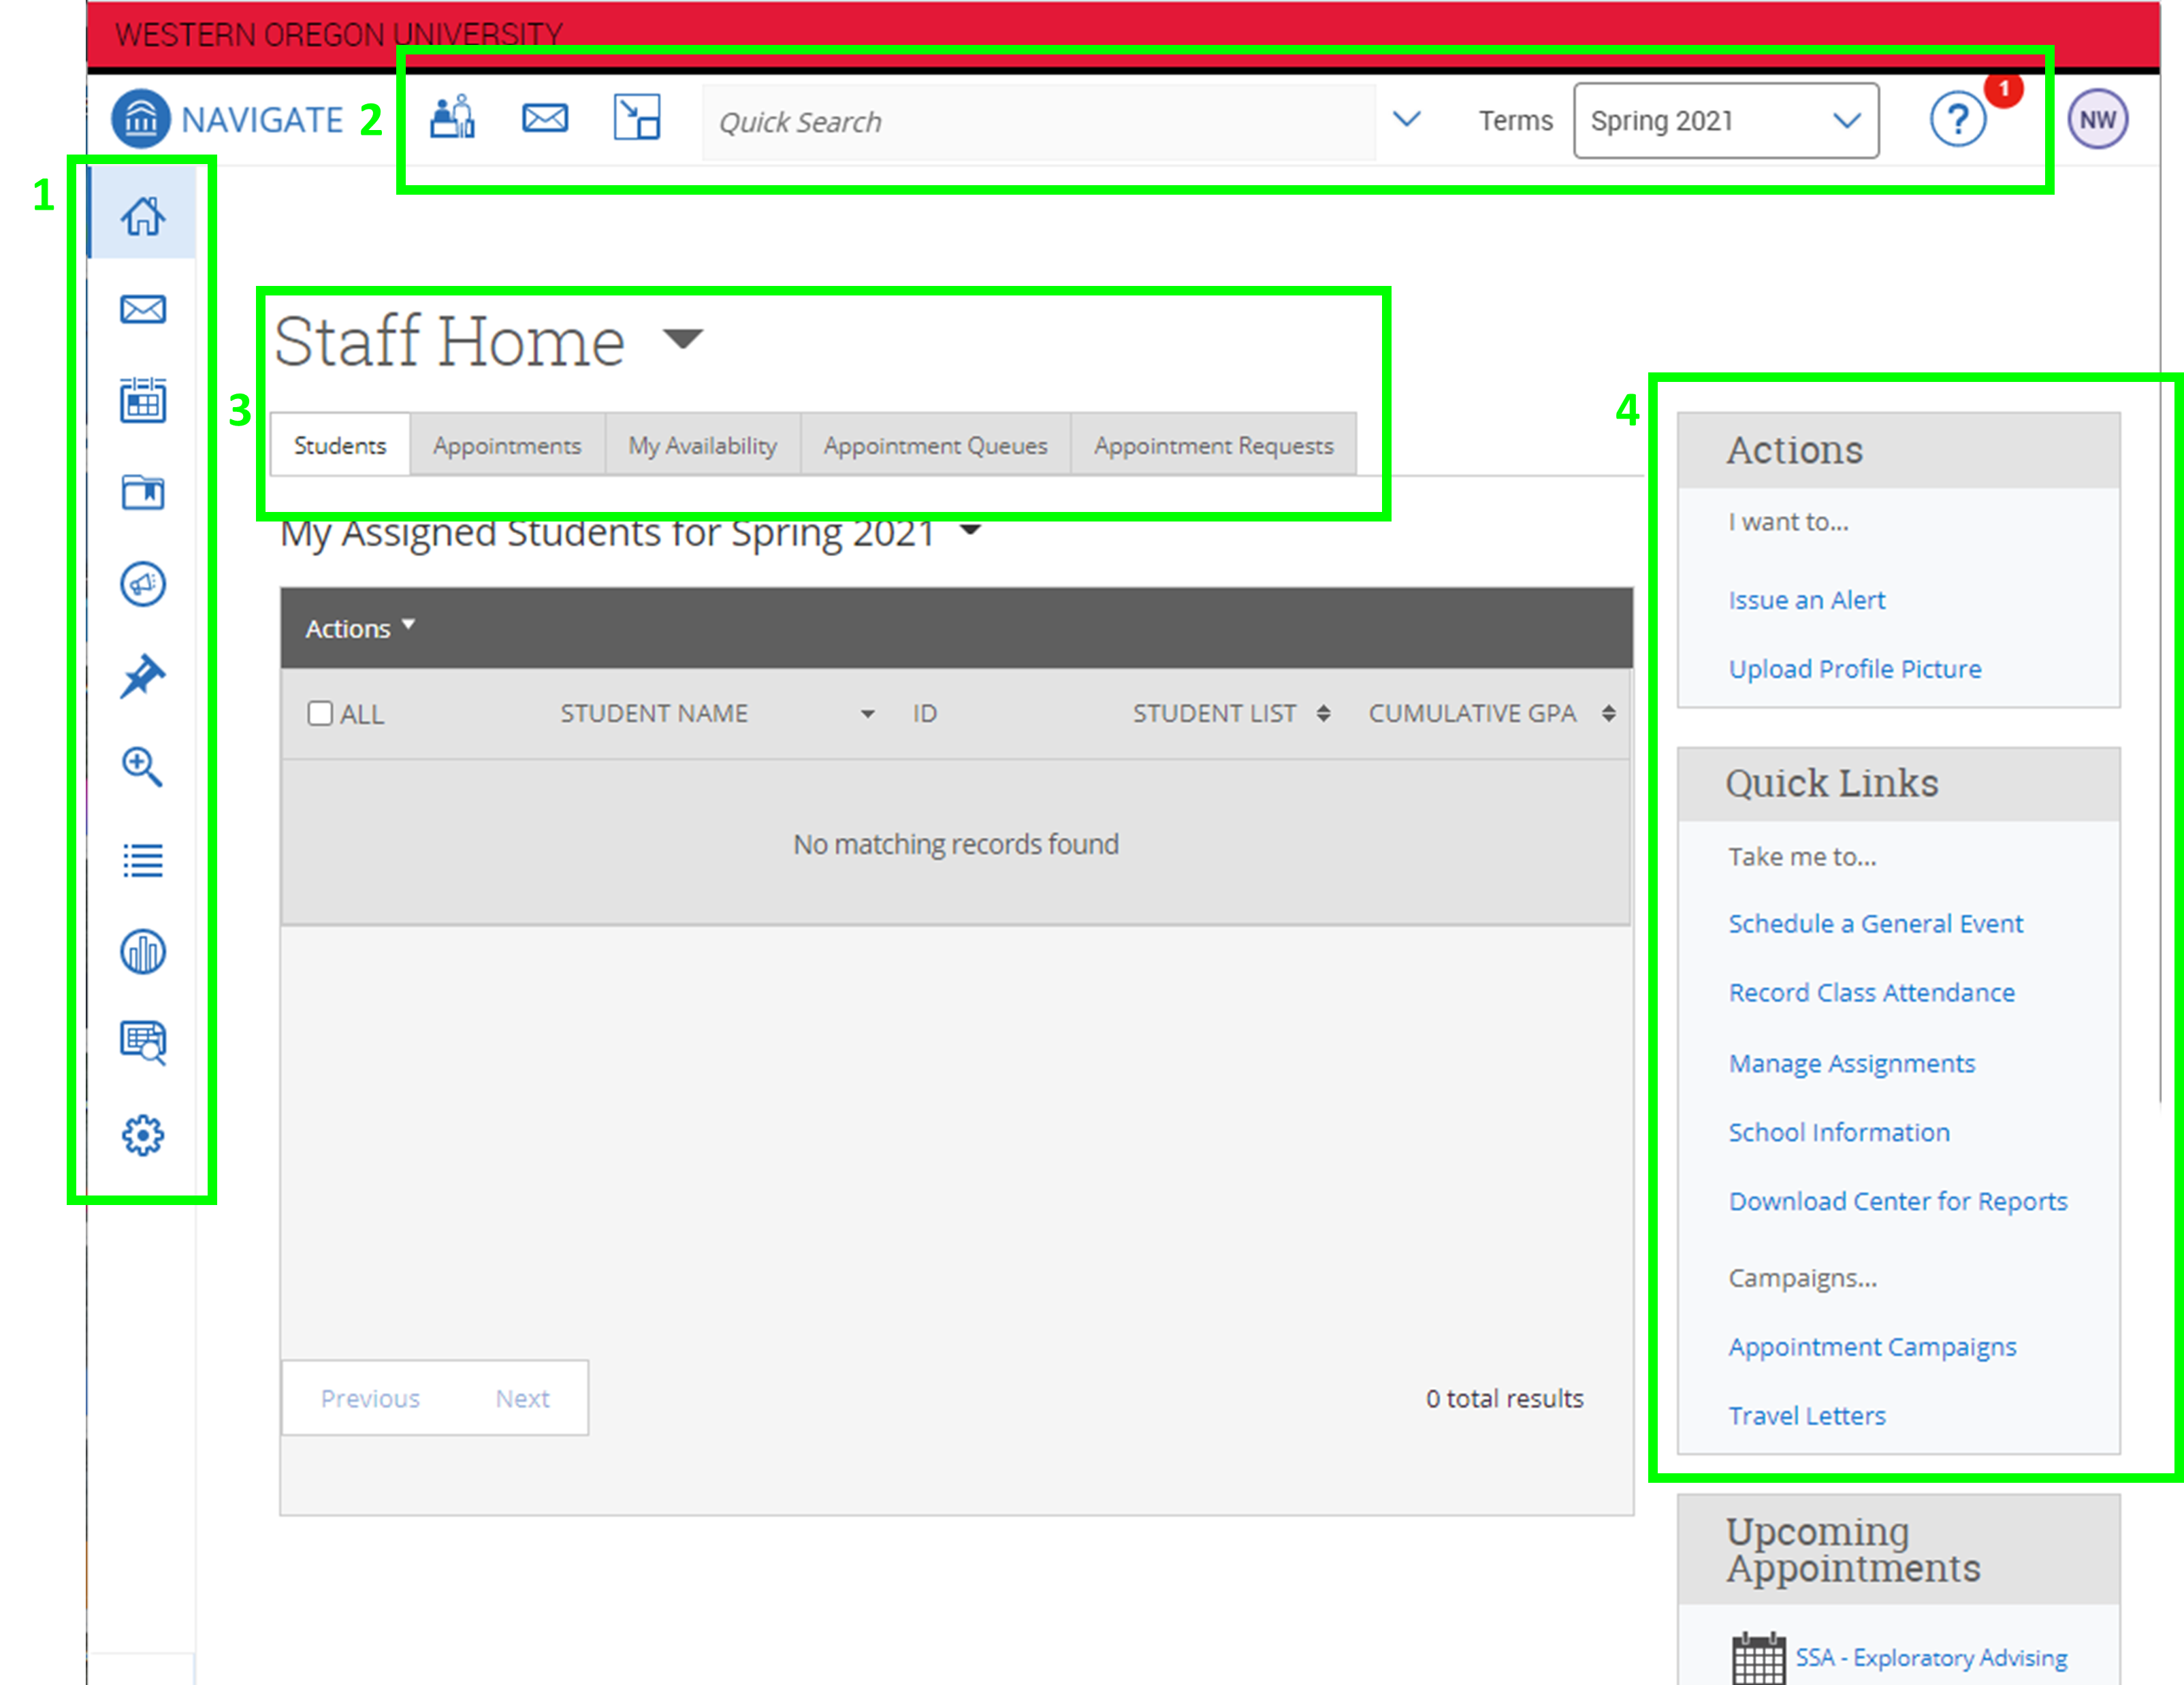
If you are an advisor, under the user profile and tabs (see the Homepage Navigation section above), you will see a list of all of your students assigned to you for the current term selected in the top quick access bar. If you have run any specific student searches (we’ll walkthrough how to do this later on), you can click on the drop down arrow next to ‘Assigned Students’ and select one of your specific searches. Additionally, you can click on the drop down arrow next to ‘Relationship Type’ to see your major assigned students for the term, or if you have any other relationship type (for example, if you teach and have a ‘Professor’ relationship).

By selecting specific or all students from the list, you can click on the action drop down to send messages to one or more students, set up appointment campaigns, issue alerts for individual/multiple students, and more.
STUDENT PROFILE
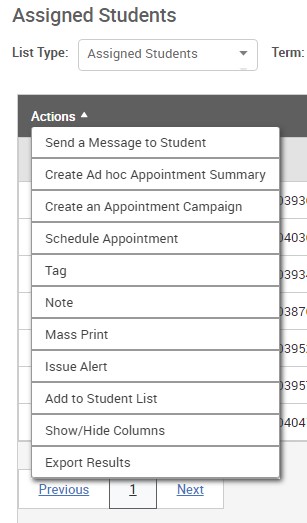
Student profiles are the most utilized feature of Navigate and are an integral part of advising. However, to understand the importance of what the student profile can do, some background understanding is required which is covered in this overview. The student profile is a set of information about the student and their academic performance. The profile contains information centered on proactively identifying students at risk of not graduating in their major and providing the tools to support the student.
- The Overview tab: this is a quick summary of how many D/F grades a student earned (F grades are included although they are no longer issued at WOU), W grades, repeated courses, cumulative GPA (though it’s called cumulative, this GPA only refers to WOU GPA), total earned credits (transfer and institution) and percentage of credit completion at institution. Scrolling down, users can also see a student’s major, history of major changes, and various categories of identifiers a student has.
- The Courses tab: in this tab, users will be able to see a student’s current courses for the term. The term can be changed by selecting another term in the top left corner of the page.
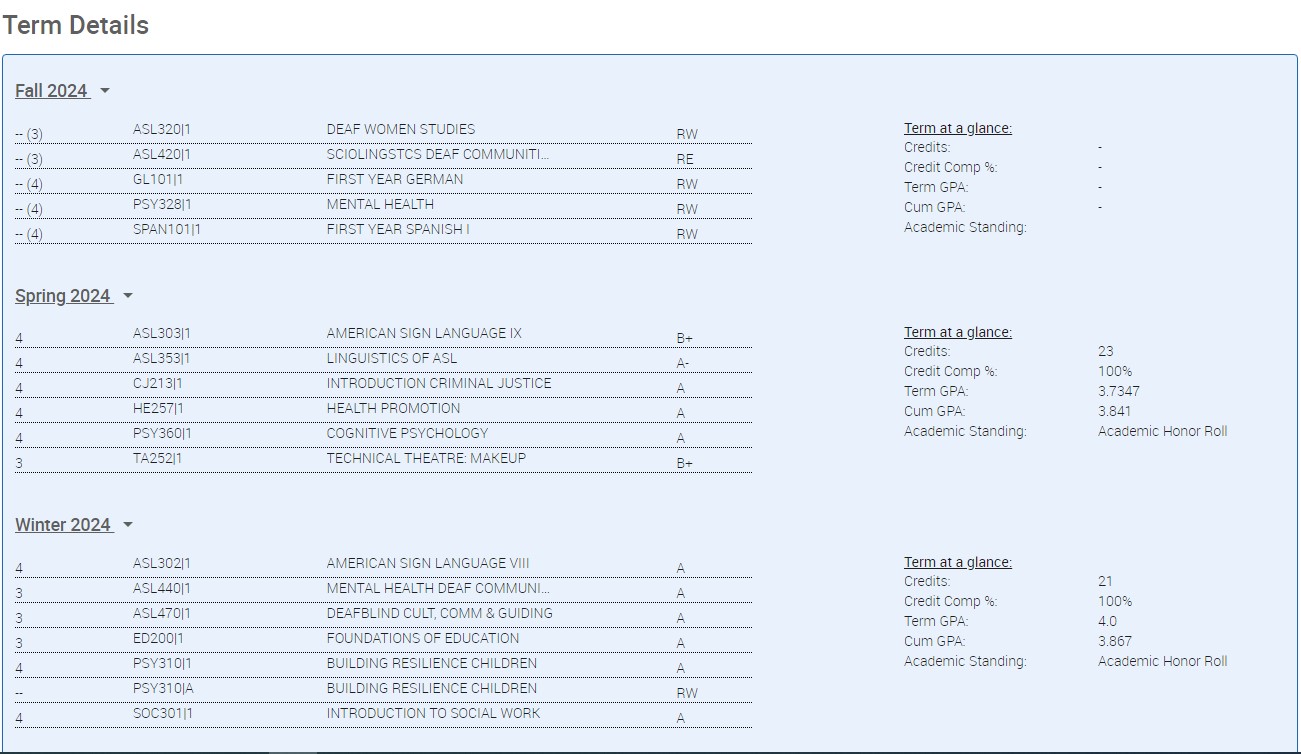
- Term Details: A student’s academic transcript will appear in the Courses tab. Scroll down from the current courses and view a student’s term by term details including grades, credits earned, GPA, and academic standing.
- The Reports/Notes tab: View previous visit to support centers, previous cases/alerts, and previous appointment summaries/advisor reports. Appointment summaries in particular can be incredibly helpful and assist with context and previous interactions with other advisors and staff.
COURSE HISTORY/TRANSCRIPTS
In the student profile, advisors are able to view a student’s current course listing as well as their academic transcript. To access this, go to a student’s page by searching for them or by clicking on a specific advisee.
On the student’s main profile page, select the “Courses” tab under their name. Their current courses will appear. By scrolling down, you will see their academic transcripts. On the right side, you will be able to see their term GPA, cumulative GPA (cumulative GPA, as it relates to Navigate, only includes WOU gpa), and academic standing for each term.
SYNCING CALENDAR AND SETTING UP APPOINTMENT AVAILABILITY
The built in appointment scheduling functions of Navigate allow you to easily allow students to schedule appointments with you. Navigate syncs with your busy/free times on your WOU/google calendar and the appointments will show up directly on your calendar. Navigate will only show appointment times to students during the availability you set up (see more below) and that are free on your calendar. This way, as you have students schedule appointments or other meetings on your calendar, those times will not be available for students to see and you do not have to adjust your availability.
Students will receive email and text (if they choose) reminders prior to the appointment and the email confirmation will include any information they need to prepare for the appointment (e.g. Zoom link, office locations, phone numbers, etc). The appointments also link directly to the student’s profile in Navigate, so you can quickly pull up student information when preparing for the appointment.
Syncing Your Calendar
If you have never used the appointment scheduling feature of Navigate, you will first need to sync your calendar. To sync your calendar, follow these steps:
1. Click on the Calendar icon on the left hand toolbar.
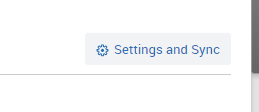
2. On the right hand side of the page, click on the Setting and Sync button.
3. Click on the Setup Sync button and choose Google Calendar. Follow the prompts to connect with your WOU Google Account.
Setting up Availability
Once your calendar is synced, you will set up your availability to indicate what times and for what reasons you are available for appointments. You will need to create availability at a specific location with specific appointment reasons. If you use multiple locations (e.g. phone and virtual), you will need to set an availability for each location. To set availability, follow these steps:
1. From the Staff home page, select the ‘My Availability’ tab.

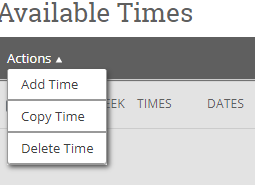
2. Click on Actions and select Add Time to create new availability. Select “Copy Time” to duplicate an existing availability. Tip: To create availability for different days of the week at different times, create one availability, copy that time and change the time and dates.
3. Follow the prompts to choose the day(s), hours, appointment type, location, and advising services you provide (e.g. Faculty Advising – Major Advisor or SSA – General Advising). Note: if you do not see the services that apply to you or your department, please email sigrahn@wou.edu to discuss adding new service reasons.
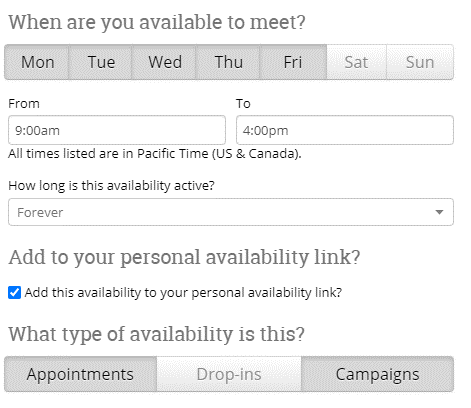
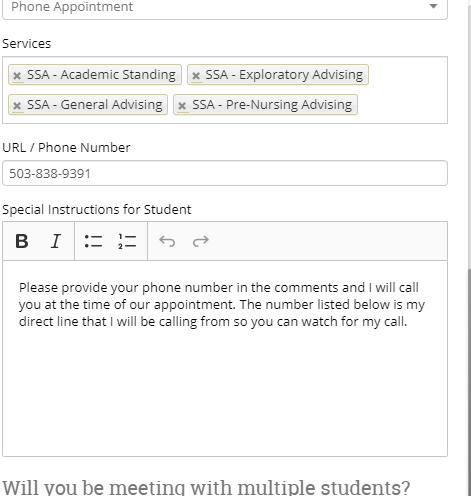
4. If the appointment is for a phone or virtual location, include the phone number or video link (e.g. Zoom) in the URL/Phone Number box. Then you can include any special instructions you want the students to take prior to the meeting. Tip: You can create separate availabilities for different appointment types if you want to create unique special instructions for each appointment type.
Once you have set up your availability, students can schedule appointments with you by logging into Navigate in their WOU Portal, from your personal availability link or through an appointment campaign (see more details in the drop downs below).
PERSONAL AVAILABILTY LINK
A feature for appointment scheduling in Navigate is a personal appointment link that takes students directly to your appointment options and bypasses several steps in the scheduling process. The personal availability link is available under the ‘My Availability’ tab on the Staff home screen (you may need to switch from the Professor/Student home screen, if you have multiple roles). You can share this link directly with students for them to schedule an appointment once your calendar is synced to Navigate and your availability is set up.
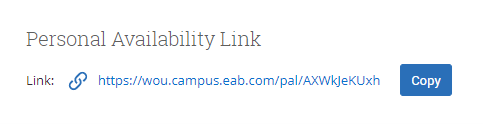
You will need to make sure the Include in My Personal Availability link checkbox is marked in your ‘My Availability’ tab for it to show as an option in your link.
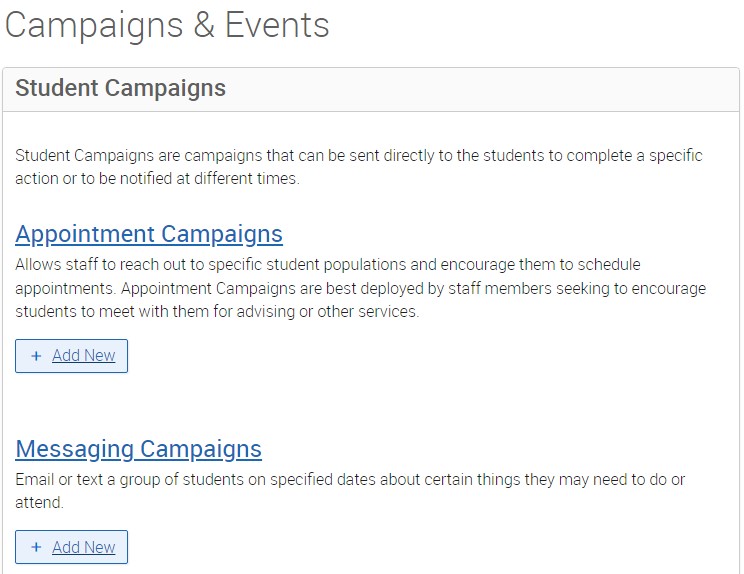
APPOINTMENT CAMPAIGNS
Appointment campaigns allow you to send an email to a targeted group of students with a link to schedule an appointment for a specific appointment reason. Students will be able select a specific date and time in which to schedule an appointment instead of the advisor creating appointments for each and every student. This feature is commonly used when an advisor wants to meet with all of their students at least once per term (e.g. for advising hold removals). Department administrators with sufficient permissions can also send appointment campaigns on behalf of staff in their area.
Creating an Appointment Campaign
1. While on the Staff Home Page, select ‘Appointment Campaigns’ from the Quick Links section or the ‘Campaigns & Events’ icon on the left hand toolbar (it’s the one that looks like a megaphone inside of a circle).
2. On the left hand side of the page, under ‘Student Campaigns’, select ‘Appointment Campaigns’ or click on the blue ‘Add New’ button. If you click on ‘Appointment Campaigns,’ you will still need to click on the new blue ‘Add New’ button, but you can also view any previously created Appointment Campaigns.
3. On the next page, fill out the fields to define your campaign. Anything with an asterisk is a required field.
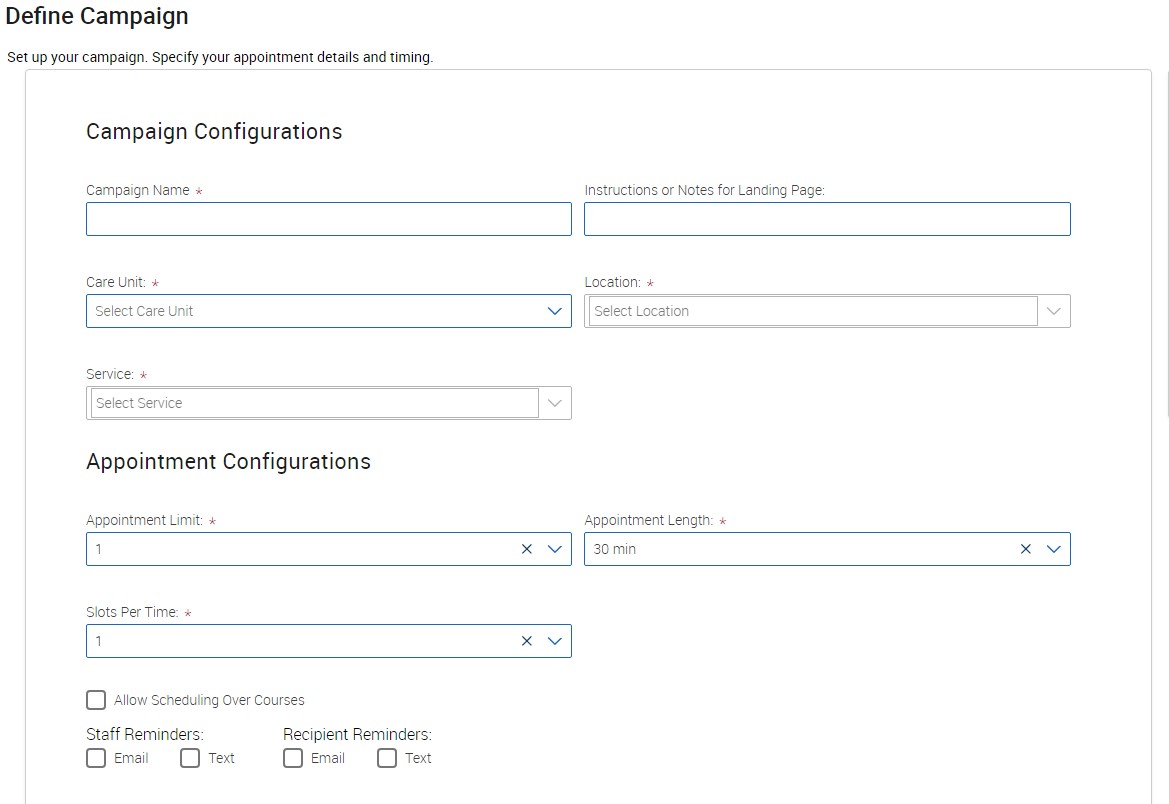
- Campaign Name (students will not see the name of the campaign). Including specific information about the purpose of the campaign is helpful, as well as if it is term-specific or advisor-specific (e.g. ‘FA24 New Advisees’ or ‘WI24 Orientation Appointments – Sigrah’)
- Select the applicable Care Unit.
- Choose your desired location (you can only select one location for campaigns). If you want to allow students to select multiple locations, you can use your personal availability link.
- Select the service (or reason) you want for the appointment (you can only select one service for each appointment campaign).
- Choose how many students you want to be able to schedule an appointment. Select 1 unless you are scheduling group appointments.
- Choose the desired length of your appointment. This will override the default time period for the appointment reason and allows you to customize the time to your needs.
- Choose the date range in which you want the campaign to run (this is the time period in which students can make appointments). If a student tries to schedule outside of that time period, they will receive a message stating that the campaign has expired. NOTE: This must match the availability you have set up in your advisor home page, under ‘My Availability’. Ensure that you have created ‘Campaign’ availability during the timeframe that you would like your campaign to run.
- Choose the ‘Launch Date’ for the campaign; in other words, the day/date you would like the messaging to students to begin.
- Once you have completed all the fields, select Continue at the bottom of the page.
4. On the next page, use the Advanced Search feature to search for students you would like to participate in the campaign. Or, choose one of your saved searches by clicking the drop-down arrow beside “Saved Searches.” Select the students you wish to include in your campaign. Confirm the list of students included (aka ‘Review Recipients in Campaign’) and remove or add students as needed and click Continue.
5. If you have correctly set up your availability for Campaigns then you should see your name on the next page under ‘Available Staff’. Check the box next to your name and select Continue. Note: if you have sufficient permissions to include others in the appointment campaign, select the boxes next to anyone else you want to include.
6. On the following page, customize your message. Begin by clicking on the blue ‘Add Welcome Message’ box; this will be the initial message students receive from your campaign. If you just want one message to be sent, you do not need to add anything beyond the Welcome Message. If you want students to receive one or more reminders, you can send those as well by clicking the ‘Add Nudge’ box (the ‘Add Nudge’ box will not appear until you create the initial Welcome Message). NOTE: When sending Welcome Messages or Nudges, always be sure to keep the Schedule Link in your email body/message, otherwise if that link is removed, students will be unable to schedule appointments. When done, select Continue.
7. On the final review page, review the details of your campaign. When you are ready, click on the blue ‘Start Campaign’ button in the lower right hand corner of the screen to begin the Campaign. If you have scheduled the campaign to start at a future date, you can still start the Campaign now, though the first message will not be sent until you have scheduled it to be sent.
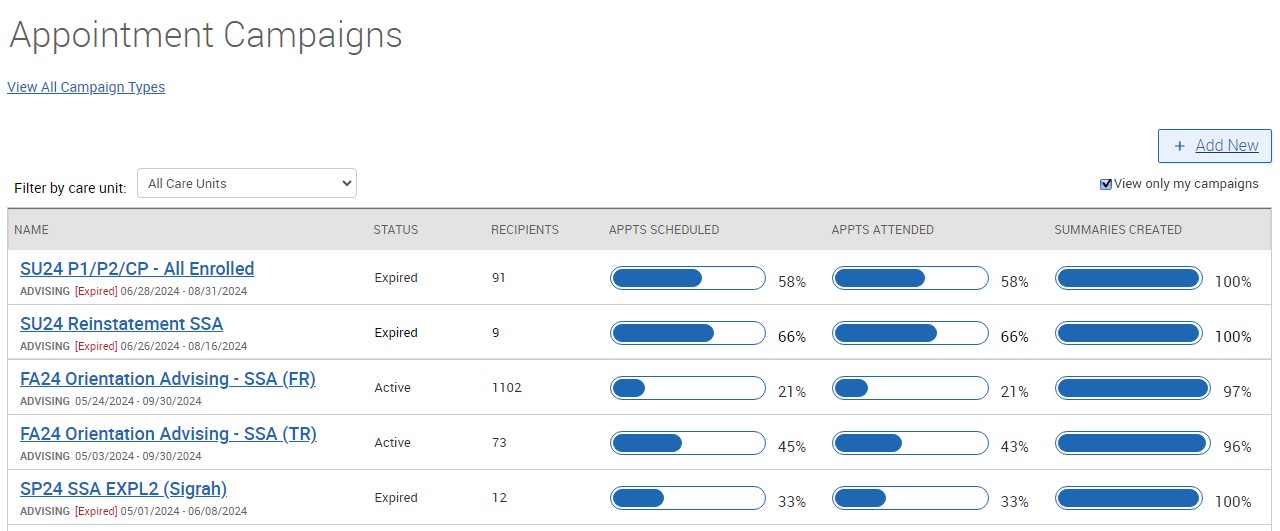
Reviewing and Resending Campaigns
You can return back to the Campaigns section of Navigate at any time to view the progress of the campaign or to resend the message to students who have not responded to the campaign. To resend the campaign, select the name of the campaign and then on Edit Campaign Details.
ADVISING APPOINTMENT SUMMARY & NOTES
Staff who meet with students are highly encouraged to document their interactions with students. Specifically for advisors, documentation is best practice and provides continuity and consistency in advising, increases communication between departments, and improves advising relationships with students. In Navigate, there are two ways to leave documentation about a student interaction: the Notes feature and the Appointment Summary/Report. NOTE: These reports are part of a student’s educational record and as such are protected by FERPA and can be requested by the student at any time.
Adding a Note
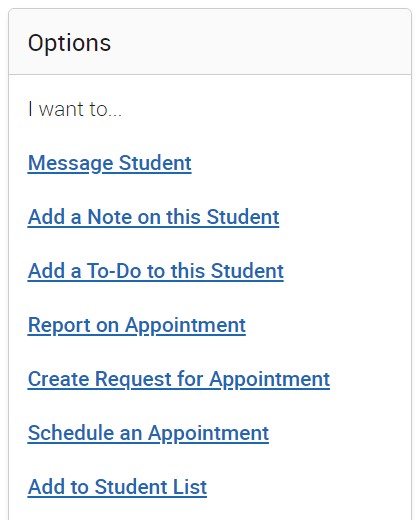
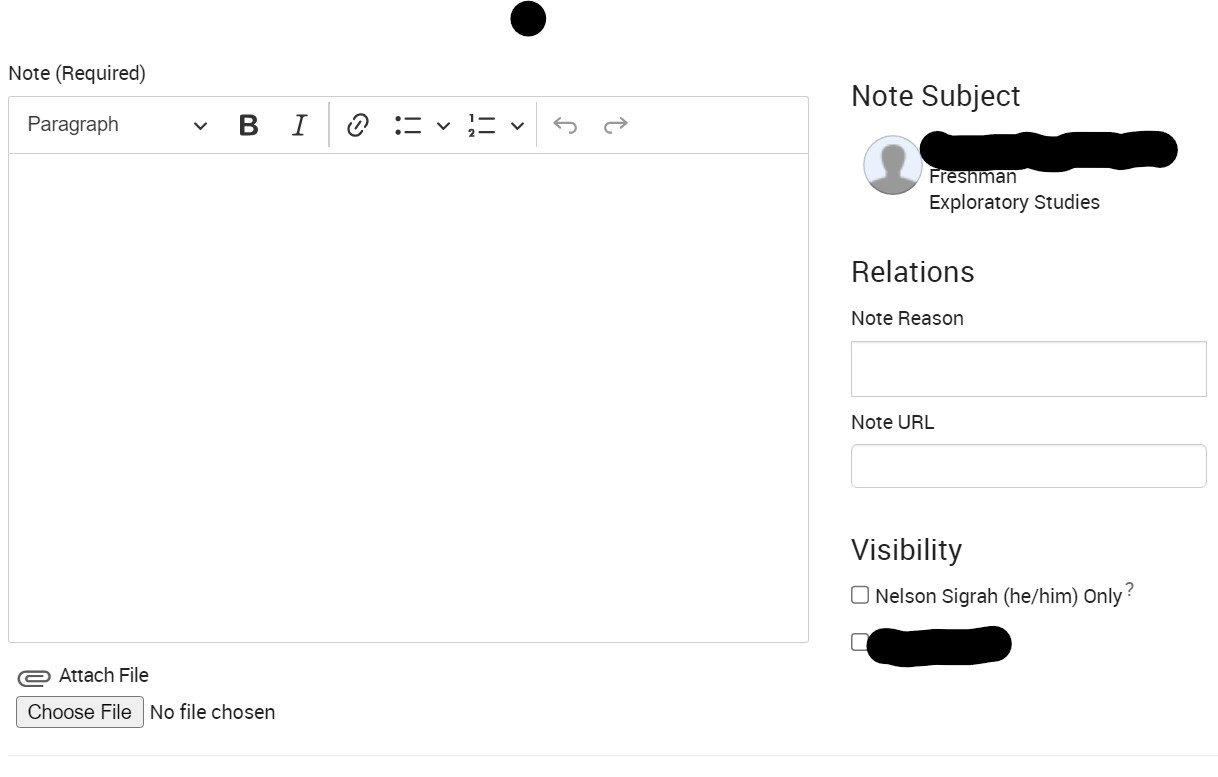
Notes can be used to add information to a student’s record for quick access or that you use as a reminder for something when meeting with the student (e.g. preferred name, degree plan). If desired, notes can also be made viewable to the student. To add a note, select a student or search for a student and go to their Profile page. Then select ‘Add a Note on this Student’ on the right hand side.
Add any details in the body of the note. You can add a note reason or attach a file if desired. Then you can check the applicable boxes to make the note only viewable to you or to make it viewable to the student. Then click on Save Note. Once saved, you can view the note in the ‘Reports/Notes’ tab of the Student profile.
Adding an Appointment Summary
If you have a scheduled appointment with a student in Navigate, you can add an appointment summary from the Appointments tab on the Staff Home Page. Click on the Appointment tab, check the box next to the student you want to add a summary for, click on the Actions button, and select the option to Add Appointment Summary.
If you have an appointment or meeting with a student that was not scheduled through Navigate, you can add an Appointment Report on the Student Profile page. To do this, select a student or search for a student and go to their Profile page. Select the option to ‘Report on Appointment’.
In the Appointment Report box, fill out any of the relevant information in the fields on the left, and write your notes in the Appointment Summary box, then click on Save Report. Once saved, you can view the appointment summary in the ‘Reports/Notes’ tab of the Student profile.
ADVANCED SEARCH
The Advanced Search function within Navigate allows you to search your students while applying multiple different filters to create specific cohorts of students based on your search parameters. Please note that while using the search function, you must only search for students that you a have a legitimate a need to know (such as your assigned advisees or students in your class that term) based on your job description to maintain FERPA requirements. To use the Advanced Search:
- From the homepage, click on the “Advanced Search” icon in the toolbar to the left (it’s the one that looks like a magnifying glass with a plus in the middle).
- Select the drop down area in each section to enter the specific parameters you want to search for (e.g. declared major, enrollment history, categories, etc)
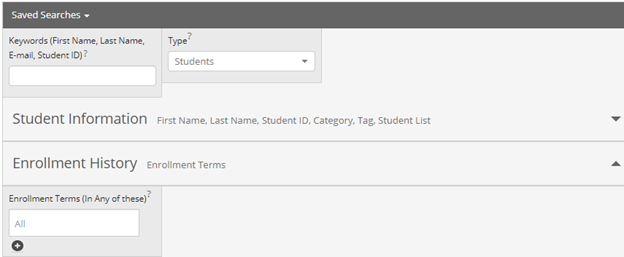
- Once you have selected the parameters you want, click on the blue Search button at the bottom of the screen.
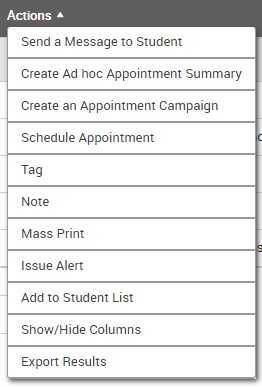
- Click on the Actions drop downs to get a list of what you are able to do with that student data. Some options include sending the students a message, creating an appointment campaign, adding the results to a student list, or exporting the results to a csv file.
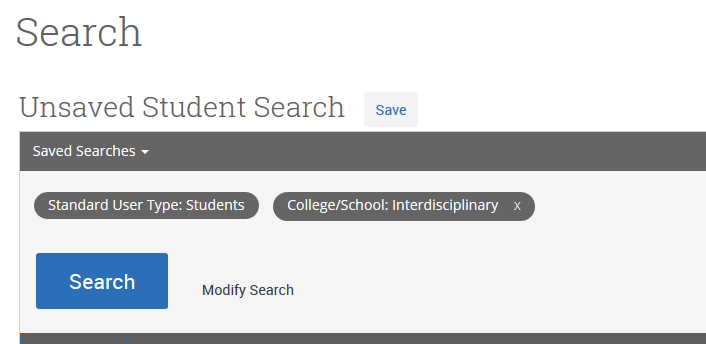
Saving the Search
If this is a search you perform frequently, you can save the search filters, and every time you click on the saved search it will give you data for the point in time. To do this, you will click the ‘Save’ button at the top of this window and name the search.
Finding Advisor Assignments
Another common use of the Advanced Search for department administrators or APAs is identifying students for each advisor or to search for students in their department who do not have an assigned advisor. To search for this do the following:
- Use the search parameters to select the current term of enrollment and desired major(s).

2. Under the last drop down “Assigned to,” under Student has relationship, select ‘Major Advisor’ and then under Staff select the desired advisor or ‘No Assigned Staff for this Relationship’.
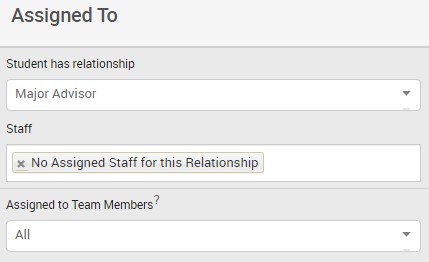
3. Then, click on the Search button at the bottom of the page. After the search loads, if you would like to download the list, select the Actions button and select the option to ‘Export the Results’.
Note: If the searches you are running are (or seem) inaccurate, please contact sigrahn@wou.edu for troubleshooting.
STUDENT LISTS
A student list can be used to save a list of students that you would like to monitor or be aware of the progress of a group of students. You can enter Student Lists in the Advanced Search, select the students to send an appointment campaign, or to track from term to term. You can create a watch list in two ways:
1. Run an advanced search in Navigate (see instructions above) with the desired parameters for the students you want to save on the list. Select Search and and then check the ALL button to select all the students which came back on your search. Then click on Actions and select Add to Student List.
You will then get this dialog box asking if you want to add these students to a student list that already exists or if you want to create a new list. Select the option to ‘Create new list’, enter a name, and Select Save. To find your list once you have created it, click on the ‘Lists & Saved Items’ icon in the left menu bar (it looks vaguely like a checklist), and ‘Students Lists’ will be located at the top of the page.

2. Upload a csv file with a list of students you want to save as a student list. Prepare your list by creating a csv file with the appropriate information (student’s name, V-Number, email address, etc). Then in Navigate, click on the ‘Lists & Saved Items’ icon, and in the Student List section, click on Actions, and ‘Upload Student List’.
You will then be walked through a few steps of uploading the file. At the end, select Save. Now, your student lists will be saved and viewable on the Lists and Saved Items page. Depending on the size of the file, it could take a few minutes for the list of students to upload (generally speaking, it should take between 5 and 60 seconds, unless you’re running a GIGANTIC list).
TRAINING VIDEOS (Please note: these videos, while still helpful, are a few years old. New videos will be uploaded when available.)
WCS: Overview and Getting Started
WCS Update Training-2021
WCS: Your Tool for Enhancing Classroom Management in a Remote Environment
FAQs
Q: What do I use Navigate for?
A: Navigate has many functions to assist you in better supporting your students. You can make appointments with students, take advising appointment notes, see what other departments and appointments students have had across campus, see detailed student information all in one place, and use the features of Navigate to track student progress, search for specific students, do proactive outreach and more. For department administrators and administrative assistants, the features of Navigate allow you to easily search for students by many parameters in your department to assign advisors, contact students with important information, and more.
Q: How do I use Navigate to schedule appointments with my students?
A: To set up appointment scheduling, you will need to sync your calendar, set up your availability, and then send your personal availability link to students or set up an appointment campaign. For more details, refer to the tutorials listed above.
Q: I tried searching for a student but got a message that I do not have sufficient permissions to view the student. Why am I seeing this message?
A: To maintain FERPA protections, staff/faculty searching in Navigate can only view students that they have a legitimate need to do so. For faculty advisors and instructors, this means you can only see students registered for your classes or who are your assigned advisees. If you need to search for a student who took a class in a previous term, you can change the term and try searching again. If you are a professional advisor who works with students from multiple majors or a department administrator/administrative assistant who works with a wide range of students based on your job description, you may need expanded permissions for accessing data in Navigate to match your position. For questions about user roles and permissions, please email sigrahn@wou.edu
Q: My advisee list in Navigate doesn’t match my advisee list in WolfWeb. What is causing the difference?
A: By default, advisee lists in Navigate and WolfWeb are term based, meaning they only show the students enrolled for the selected term. If the lists are showing different students, you can double check to ensure that the terms selected are the same in Navigate and WolfWeb. At the end of each term, Navigate will automatically roll forward to the new term and only show your students registered for that term. You can change the term by clicking on the ‘Term’ portion in the middle of the Navigate home screen.
Navigate also allows you the option to filter students by advisor type (major, minor, etc) or to see your assigned students for all terms. To do this, select the drop down arrow in the ‘Relationship Type’ box on the Navigate home screen. If the terms are matching and you still see differences between your advisee lists in Navigate and WolfWeb, please email sigrahn@wou.edu.
Q: I am a department administrator or program assistant but I am not able to view students in my department. Why am I seeing this error?
A: Faculty and staff are automatically assigned roles based on Banner codes (e.g., staff, advisor, instructor, coach, etc) with the ability to see their assigned students based on that role. Users outside of those basic categories (e.g. department head, division chair, administrative program assistants), who have a legitimate need to access additional information outside their assigned students, can request their user permissions to be updated to the most appropriate role. To request a change in user permissions, email sigrahn@wou.edu with the following information:
- Your position title
- Description of what information you need to access in Navigate and how it aligns with your job duties.
- Confirmation that you already have permission to access the student data in Banner (approved through the Business/Registrar’s Office)