Tables
Inserting a table
- Put the curser where you would like the table to go
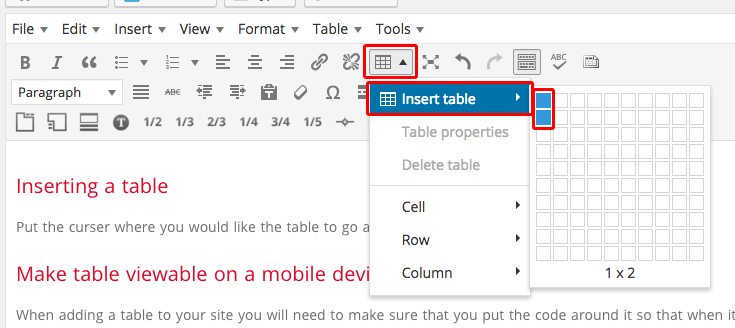
- Click the Table icon from the Toolbar
- Hover over Insert table
- Hover over the amount of table cells you would like and then click

The table will then appear with the amount of cells you selected.
![]()
Adding content to your table
- Put the curser in the table cell you want the content to go and start typing or click the Add Media button to insert an image.
Note: if you hit the return button while in a table cell it will auto create a paragraph style so you might notice the font size change. If you would like to match the other styles to this you can select them and change their style to a Paragraph.
Adding a background color
- Select the table cells you would like to change the background color

- Then click the Table icon and select Cell then Table cell properties

- Click the Advanced tab
- Click on the square next to the Background color and select the color you would like
- Then click OK
Note: You will need to stay within the WOU Guidelines – if you want to use a red background color type #db0a29 to get the WOU red.

You will notice the color of font will stay black so you will need to select the font and change it to white if you changed the background to a red so you can read it.
- Select the font

- Click on the Text color icon from the Toolbar and select white.

| Header 1 | Header 2 | Header 3 |
| Content | Paragraph
content |
Content with paragraph style |
[fruitful_sep]
Make table viewable on a mobile device
When adding a table to your site you will need to make sure that you put the code around it so that when it is on a mobile device people will be able to scroll horizontally and view it.
<div class="table-responsive">
  <table class="table">
    ...
  </table>
</div>

